

caj
-
Posts
80 -
Joined
-
Last visited
Recent Profile Visitors
911 profile views


caj's Achievements
Advanced Member (3/6)
-
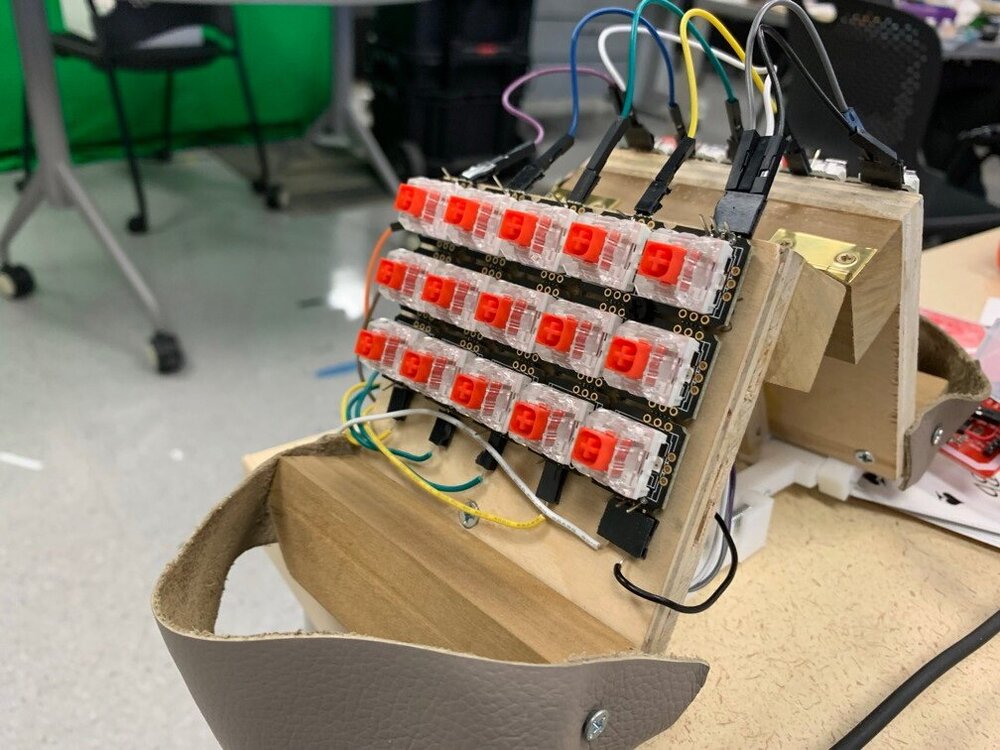
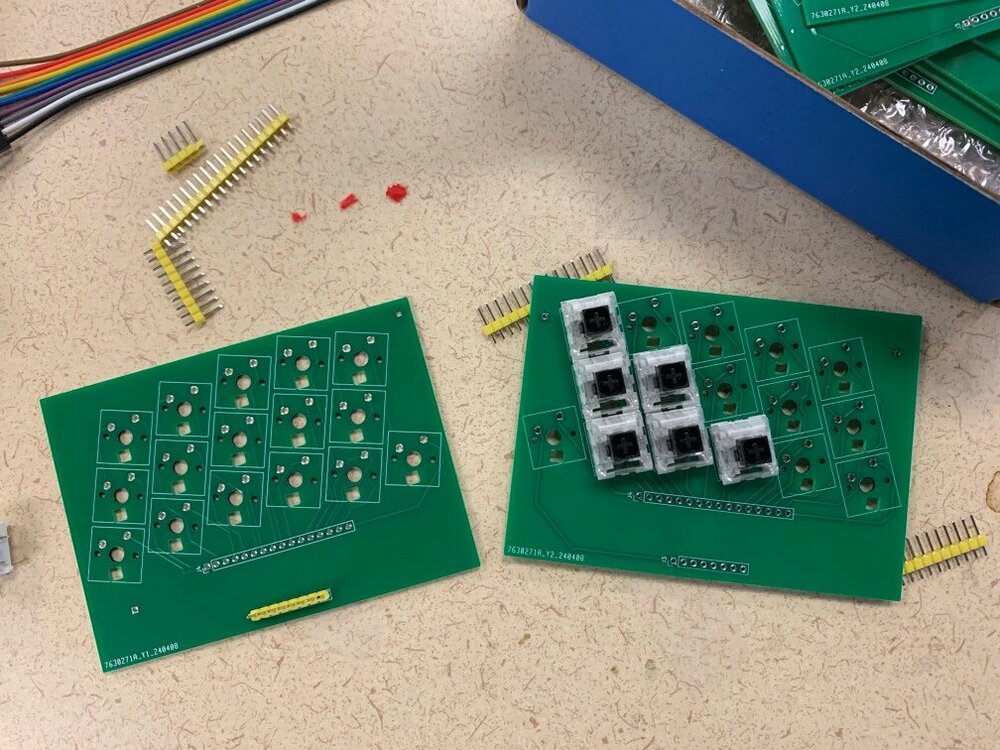
I've been taking a cheap-and-fast MIDI concertina project and gradually improving it. Previously I 3d-printed a homebrew position sensor for the bellows, which seemed to work well. Now, for the buttons. The current box uses a 5x6 ortho keypad from Adafruit, which is really cool but hard to play: firstly because the buttons are in a rectilinear grid, second because they are spaced apart about 2cm center-to-center (see picture.) I like the performance of the cherry key switches, however, so I fabbed up a PCB to hold a bunch of keys in a more appropriate concertina layout. The boards just arrived from JLCPCB (other picture.) The keys in each column are now 1.5cm center to center, and the same between columns (and I can bring the columns closer together by 1mm.) That's still a tiny bit wider than my Crabb, but this allows me to use cherry switches. As a project, it means that a hobbyist can upload the files to JLCPCB to get them in the mail a week later, and buy the switches, and only a bit of soldering is required. I'll be installing the parts over the next week, pretty much as they arrive. The board has the traces for reading the buttons so there will be fewer wires to pop out and it will look less like a science project. I also opted for a key footprint to solder the keys down directly, rather than soldering in sockets for hot-swappable switches. It only took a little playing to realize that the key switches are best held down securely.
-
MIDI concertina feature wishlist
caj replied to Łukasz Martynowicz's topic in Instrument Construction & Repair
I would also recommend an "all notes off" button somewhere, just do deal with any transient error, however rare. -
Hi all, A while back I built a cheapo MIDI Anglo using an analog joystick for the bellows position. It worked well enough to demo, but the analog joystick had a lot of issues that prevented me from playing at speed. To this end I replaced it with a homebrew Hall effect sensor, pictures attached. This sensor is just a 3D-printed slider that uses pen springs to keep it centered. One slider holds two cube magnets, and the other holds a 49E analog Hall effect sensor, which gives me an analog voltage I can read on my Teensy concertina. I've only just installed it and haven't tweaked any parameters, but it's already much more responsive and reliable; I can play faster and more smoothly, and the response is much closer to my IRL Crabb. I've uploaded a video of the sensor itself doing its thing, and here is a video of it installed and demonstrating a bellows shake. Next I have to get rid of these ortho keypad buttons, because they're spaced too far apart for my tastes.


- 1 reply
-
- 1
-

-
Cheapo MIDI concertina with off-the-shelf parts
caj replied to caj's topic in General Concertina Discussion
I just had a lucky breakthrough on the synth, which has me as psyched as as getting the instrument built and working. Check this out, and tell me it isn't close: So this is just Mainstage on the Mac (I was using GarageBand but got sick of its sub-par handling of MIDI input,) and at first I dug around and chose the Orchestral English Horn voice because it was kind of reedy --- that's what you hear on the first recording. Then I dug through the effects and added the Fuzz-wah effect with the wah turned up and the range turned up to the stop. That alone makes a convincing concertina sound. I also added some EQ here to louden the low notes, and I'm experimenting with some other EQ tricks to try to give it a bit more "haw." But 99% of this is just combining an English Horn with a high-range Fuzz-wah. -
I had a bunch of ideas for an electronic concertina, but I never really got around to building them. This week I decided that better is the enemy of done and I built one from standard parts. I'll have to clean up the wiring -- I just got this done like a couple hours ago. This is simple enough to be a fun project for an enterprising student, and it's all standard stuff from Adafruit or the hardware store. From the hardware store, the sides are 1/2" plywood cut into 4x4 inch squares (I should make them 4x5 to accommodate the handrests better,) 1" square dowel, and a small hinge. You can see the setup in the video at about 4 seconds: the squares are glued to the front dowel pieces, the hinge connects them in front, and more dowel for handrests are screwed (NOT GLUED) on the back, scrap leather screwed to them. The electronic parts, which I bought from Adafruit: A 5x6 neokey snap-apart keyboard grid This is practically made for making an Anglo, as it's 30 buttons and designed so you can snap it into two 3x5 halves that will still work. Plus it has cool LED effects, as you can see. The only downside is that it's an ortho keypad, but it's less of a problem than I thought it would be. A thumb joystick with breakout board This is a really cheesy way to create a bellows: I mounted the joystick inside one side, at 45 degrees (again see at about 4 seconds), and I drilled a 1/8" hole through the thumb stick, and another hole in a bit of 1/2" dowel glued to the other side. A bit of metal from an old campaign sign was bent to connect them. I thought this would work horribly, but it works well enough that I can play fast. 30 cherry switches. You can get these at Adafruit or elsewhere. I think I prefer the linear cherry red for responsiveness. An Arduino --- I used a Teensy 3.6 but only because it was the closest to where I was sitting. You need an Arduino that can handle at least a dozen digital GPIO pins and at least one analog in. Buy one that is small enough to stick to fit in a halfsize solderless breadboard. A halfsize solderless breadboard. I had to remove the side pieces to get the thing to fit, but it just sticks on. I then used male-male jumpers and soldered some female jumpers on the keypad and joystick. Not exactly fine craftsmanship, but I'll save that for version 2.0. And that's it! I used the sample code from the Adafruit site for the neokey keypad, and modified it to correct for the breaking of the keypad into two halves (you connect the OUT of one 3x5 grid to the IN of the next one, and the LEDs snake down it like a 10x3 grid instead of a 5x6 grid.) Once I did that, and verified I was reading the keys and the joystick correctly, I just modfied it to use usbMIDI instead of serial out, and emitted MIDI notes from an array. Done!
-
Hi, It might be easier to simply machine them from Delrin. I had to replace the buttons on my concertina (I bought it in a condition where many of the metal buttons were worn down significantly.) What I did was buy Delrin rods from McMaster-Carr, and mill them to shape with a Dremel tool. To make the bottom peg of the button, I discovered a neat Dremel trick. I set a Dremel tool in that dinky Dremel drill press that they sell, with a fat cylindrical grinding bit close to the drill press platform (a little less than one rod diameter away). Then I'd take a few inches of Delrin rod, hold it firmly to the platform with both hands at the ends, and roll it firmly so that the middle of it rolls into/under the grinding bit. By rolling it in, this mills the middle to a skinnier diameter, and I then cut it in the middle to produce two button blanks. It took surprisingly little time to make a full set of replacement buttons this way, machined with great uniformity despite my grad student budget and my cheapo tools.
-
Hi, sorry I've been away, I built a MIDI anglo a long time ago by pushing 30 SPST push-buttons into the holes of a Stagi, removing the action and the reeds. It was luck, really: I found a pack of 40 push buttons at a surplus store in California, and they were a perfect fit, skinny and just the right action. The rest was a bidirectional pressure sensor for the inside of the chamber, and a PIC microcontroller to output MIDI---that was back when a PIC ran about 1-2MHz and had no serial organ, so outputting MIDI required some carefully written assembly code. It never worked in a very satisfying way (the bellows were very leaky and I wasn't reading the pressure sensor well) and eventually I purposed the buttons to other projects. If I had to do it again, I'd probably skip the pressure sensors and experiment with microphones. I bet if you sealed the bellows and drilled a hole in the pan, a cheap condenser mic right next to the hole would decently measure air flow from the hiss. Two of them with flaps would give you push/pull. But the big problem would be acquiring a nice set of bellows, that isn't part of a nice real concertina.
-
That's for sure. I made buttons for my Crabb, and one can see a clear difference in skill between the left and right sides as I slowly figured it out. I made buttons from 3/16" delrin rods, bought from McMaster-Carr. The fabrication was pretty simple using a dremel tool etc. Maybe I should put a photo essay up, as an excuse to refab the left-hand side. Caj
-
Indeed, my own layout had to be built before I could tell if it would work at all. It will take at least a month of acclimation before I can say anything definite on its ease of use---I will also have to tweak the reedpans, which for one reason or another result in a couple less responsive notes. It is much harder to evaluate when something is mechanically off. In the end, there is no way to tell if something will really synch with someone's brain, and we know that even with popular layouts, which are all known to work, the layout results in different playing styles etc. Caj
-
I believe that most chords can be played, save for a couple very obscure ones. The original design allowed all chords in all keys, over the full range of the instrument, but this had the tragic disadvantage that some crucial melody notes weren't available in both directions (towit, D) Adding D and A to the extra buttons restricted a few weird chords. Caj
-
You're right, it isn't Catalonian. I mistyped: this was wine I had when in Catalonia. The layout is as follows: (Pull/Push) Left side Right side E5/C5 F#5/A5 A5/E6 C6/F5 C#6/G#5 Bb5/Eb6 B5/F#5 D6/G5 G5/B5 F5/D5 (high) E4/C4 F#4/A4 Bb4/Eb5 B4/F#4 D5/G4 A4/E5 C5/F4 C#5/G#4 G4/B4 F4/D4 (medium) D3/C3 F#3/A3 A3/E4 C4/F3 C#4/G#3 Bb3/Eb4 B3/F#3 D4/G3 G3/B3 F3/E3 (low) pinky ----> index finger index finger<---pinky I may have the octaves a bit wrong there (but thankfully not in the box.) The outer two columns are extra notes and allow chords. The inner 3 columns on each side are for playing melody. Note that a scale jumps all over the map. Pick any scale in any key, and follow the buttons in the 3 inner columns (index-ring) For example, a C scale is: L2 R3 L3 R2 L1 R1 L2 R2 Whereas a full chromatic scale over all 3 octaves is L2 R2 R3 L1 L3 R1 R2 L2 L1 R3 R1 L3 R2 L2 L1 R3 R1 L3 L2 R2 R3 L1 L3 R1 L2 R2 R3 L1 L3 R1 R2 L2 L1 R3 R1 L3 Caj
-
This is actually a Norman Model H, with the reedpans removed, and a custom set of accordion reeds installed to follow an absolutely daft and nonsensical note arrangement. I completed it this afternoon. The package store down the street just started to carry my favorite Catalonian wine, just in time for me to celebrate its completion. This note layout was designed to have all sorts of crazy mathematical properties, which as a grad student I confirmed using extensive computer simulations (on MIDI files generated from ABC tunebooks.) They are: All keys are equally "easy" to play; The layout minimizes the probability that two consecutive notes require two different buttons in the same column. I hate it when that happens; All melody notes are on the first three fingers, no pinkies except for harmony and alternate notes. This is even true on the low end of the concertina's range; All scales, major minor etc, are semi-smooth, requiring two direction changes per octave; Playing in octaves is possible over the entire range of the instrument. Okay, the downside is that the note arrangement follows no pattern that makes sense to any sane person. Basically it took me 15 minutes to find the G scale, and I designed the thing. Okay, maybe that's an exaggeration. But my design assumption is that, like typing and playing the Anglo, patterns don't matter; all that matters is practice and muscle memory. So over the next week I will try to learn to play a few tunes on the thing. I will also tweak the mechanics, because my reedpan-building skills are not perfect. Caj
-
Midi Concertina From Concertina Connection
caj replied to jggunn's topic in General Concertina Discussion
I once built a MIDI Stagi with a PIC16F84. Never finished it, but I did get to the point where it was outputting notes. The pressure sensors were too noisy, however. Anyway, a 16F84 is a fairly cheap, low-end PIC, if you can still buy one. And that had enough non-volatile RAM that I could squeeze in two different keyboard layouts with suffiently clever coding. For different keys using the same "layout," you wouldn't need the RAM. Just read the key from a switch, and add the appropriate number of half-steps to each note before it goes out the door. Caj -
Thanks for all the information.
-
Hello, The inner lining that holds the reedpan snug: am I right in assuming that this is the same material the valves are made from? That is the impression I get from my Crabb. I ask because I have a set of bellows from an accordion-reeded box, and I am building traditional reedpans for it. I need to line the interior for a snug fit. Caj


