

charleschar
-
Posts
19 -
Joined
-
Last visited
Everything posted by charleschar
-
Planning a first build- reed question
charleschar replied to Rayune's topic in Instrument Construction & Repair
Both concertinas play pretty much as well today as they did when they were first finished, so for my original post to imply that they waned over time was misleading. Paperclip springs were very wonky and don't provide a consistent spring tension so I switched to phosphor-bronze wire with a spring-making jig. The cardboard in the bellows worked fine for me, though I would use something stiffer and stronger in the future, and the electrical tape combined with felt to capture the pad hole profile worked well for sealing the pads. The leather I used for the bellows was a bit cheap and I don't think the PVA glue worked that well for sealing it. In the future I would use hide glue and good sheepskin leather. Although using aluminum for a pin on the aluminum action levers isn't the best material choice, I have had no issues with the action levers and they still operate smoothly. The cost was an estimate of how much my build would cost for someone who didn't have a lot lying around like I did. In my case, the most costly things were the reeds from the old accordion I bought for $80. -
Planning a first build- reed question
charleschar replied to Rayune's topic in Instrument Construction & Repair
I'm glad that my videos have been inspiration to you. I consider the first concertina I built to be badly and cheaply constructed and the second to be significantly better but still rough in areas due to lack of attention, research, experience, or skill. Regardless, both instruments still play today (second has held up especially well) and while they aren't good instruments in comparison to professional ones, I think they represent that concertinas can be built relatively cheaply and still be playable (under $200 and $300 in raw material for the 1st and 2nd respectively!), especially if you aren't a newbie to metal/wood fabrication and didn't know how to make a complete design beforehand like I was when I built them. While I am not an expert in concertinas like many members of this forum, I used reeds from old accordions in both of my builds and would not change this were I to make another one. They can be perfectly functional and sourced cheaply if you know where to look and are willing to put some time into their refurbishment, although they produce a different timbre than concertina reeds which some find undesirable. If you have enough time/desire, I encourage you to try building your own as it is satisfying and a great learning experience. It seems to me that a low demand for concertinas and their mechanical complexity has caused them to become significantly expensive, making constructing them yourself a great project. I feel happy with and enjoy playing my second concertina, and that's coming from someone who did a half-baked job on many parts of it! -
There is this video by Toru Kato of him playing the song on a 40 button anglo, which still has greater harmonic capacity than a 30 button but is more closely related to what you're looking to do. https://www.youtube.com/watch?v=4pCKoIKQCI8
-
£235 Anglo Kit
charleschar replied to Squeezebox Of Delights's topic in Instrument Construction & Repair
Very interesting! If the aim is to deliver the experience of building a working instrument for a low cost, though, I am curious as to why it was designed with 12 sides, as I would think that adding more components to the build would drive up the price. -
Beginner Duet Instruments
charleschar replied to alex_holden's topic in General Concertina Discussion
I suppose that's a reasonable perspective to consider. -
Beginner Duet Instruments
charleschar replied to alex_holden's topic in General Concertina Discussion
I am curious whether it would be feasible to sell duets that have a beginner-friendly price tag but also enough range to justify buying one over an Anglo. It seems to me that the general lowest button count for duet concertinas is around 35 buttons, which is the number of buttons on the smallest Crane in the Crane & Sons Crane tutor (though I'm sure that smaller ones exist) and 1 button more than the Concertina Connection Elise, so I think it would be relatively reasonable to say that this is where a lot of beginner-priced instruments would be at. While this may not be the experience for everyone, if we are talking about Cranes specifically, I feel that the minimum number of buttons needed for the music I play is around 40 and would not like to play with much less than that. I guess it is a personal preference, but for the me the appeal of a duet is to be able to play music with decently large musical range with an intuitive button layout, and the advantages a small duet has over a 30 button anglo are not terribly significant to me. -
Completed Homemade 25 Button Anglo
charleschar replied to charleschar's topic in Instrument Construction & Repair
I used a long and wide strip of leather with glue on the grain side and wrapped it around the circumference of the bellows frame to join the ends of the bellows and the frame together. My homemade crane duet video has a section in it that shows this. I would recommend first using strips of bookbinder's tape or linen to join the bellows to the frame and then attaching the leather on top. Bob Tedrow also made an excellent walkthrough on how he does this here: http://hmi.homewood.net/twitterzephyr/zephyr8/ -
Wow, this is quite amazing. I'm a bit surprised that there are only 5 folds on the bellows for an instrument with a range like this, and the fact that it is double-action is impressive. I suppose it makes sense to have concertina reeds for the bass end, as many more bass concertina reeds could be placed in the same amount of space as bulky, rectangular bass accordion reeds, since they can be placed much more freely radially. The "Primo" reeds, on the other hand, can be accordion reeds because the amount of space saved by switching to concertina reeds would probably be much less for higher notes, hence maybe the creator wanted to save costs by using accordion reeds. The button layout is also interesting, as I thought there would have been much more appealing options for a duet (Crane layout, Maccann layout), so seeing a variation on the chromatic Wheatstone duet system is quite curious. Maybe these chromatic system concertinas were more popular than I thought, or maybe it made sense to choose this system to be able to fit in all of those reeds in that tight of a space. Any chance you'd be willing to share a sound sample of the instrument?
-
How does the single action work?
charleschar replied to Bassconcertina.net's topic in Instrument Construction & Repair
Here's an example of what I think OP is referring to seen in a single action Wheatstone (no 612): There is a central hole in the action board which has a leather valve on the other side to allow for air to come in on the pull. The buttons which are in the middle are supported on "peninsulas". Here's more information about this concertina: https://www.concertinamuseum.com/CM00015g.htm Not too sure why a standard size treble concertina would be single-action though. Maybe these earlier ones were just experiments to see what worked before a larger, lower concertina was built. -
Have you visited this page? There is a vast archive of documentation on many types of concertinas, including extensive photos of the inner workings of each. Search "Jedcertina" with Ctrl +F and you'll find a concertina just like the aforementioned. https://www.concertinamuseum.com/cmusindex1.htm
-
I see. Good point about using the high Eb on the right side. Thanks.
-
Well, in that case, thank you for the idea! Yes, I too find the low B to be useful for the same reasons you state, though I do occasionally appreciate the low Eb for B major and maybe the occasional C minor or Eb major. I could definitely see the use of the low G. If you don't mind me asking, what other changes/additions are you planning for your new Crane?
-
Thank you. I was more partial to natural notes when creating the note layout, as I tend to play in common keys like C and G, though there certainly are instances where it is annoying to not have the 2nd Eb or F# on the left hand and having to play it on the right hand instead. I also borrowed Alex Holden's idea of having some "Anglo-style notes" on the lower C# and Eb buttons, which also play a low A and B respectively depending on the push/pull. May in the future retune the lower C# to a Bb.
-
Glad you enjoyed it! I was the the creator of the concertina and the video. The instrument was designed to be built without proper reedpans, sort of like a Tedrow accordion-reeded concertina, so the reedpan is connected directly to the action board, with slots for the accordion reeds to fit around on the underside, rather than sunken chambers with walls like on a traditionally-reeded concertina.
-
I agree with the saw idea; depending on the intensity of your work, a foot-powered scroll saw would be useful for cutting fretwork in ends or other small pieces.
-
Completed Homemade 25 Button Anglo
charleschar replied to charleschar's topic in Instrument Construction & Repair
Thank you. I forgot to mention the end plates in the post. Since they have no fretwork, the end plates are separate from the action walls (screwed on) and there is enough of a gap where they join to allow for air to move in. Not the best design, and I'd do fretwork in the future, but it was convenient for a first instrument. -
Completed Homemade 25 Button Anglo
charleschar replied to charleschar's topic in Instrument Construction & Repair
Thank you, I'm glad you liked the sound. Yes, I would like to make another in the future with more range. I like playing both bass and melody on concertinas, so I may experiment with making a duet or a 30+ button anglo. -
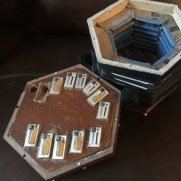
Hello everyone. I've neglected to post this for quite a while now, seeing as this was completed in the summer of 2019, but I've finished building a 24 (+ air) button anglo concertina from fairly regular house materials, except for a few tools that needed to be made for the process, and piccolo reeds from an old accordion. This may not be an instrument of great quality and I do not necessarily promote the practices shown in the video to make or repair quality concertinas, but I feel that I have done a good job of making a reasonable quality instrument that plays well and have learned some new building techniques that have not been used in older instruments and may be just as good as previous practices. Here is the video documenting the process (clip at the end is a version of Gary Coover's arrangement of "Somewhere over the Rainbow"): Some notes about the design: Bellows: Made of cardboard, which is not the best material for stability compared to ragboard, but is surprisingly airtight. If I could find more stable cardboard, I would use it again. The type of leather used is unknown to me, but I suspect it is something like cow leather, which served the purpose well, but was a bit weak in thin areas. Masking tape was used to hold the bellows together before leather, but did not hold them together well. I would use gummed cambric tape in the future. I used Elmer's glue to attach the leather to the bellows, and apart from the areas where two leather pieces were joined together, this held up well. I suspect the leather-to-leather glue-up failed due to not sanding the face of the leather piece before gluing it to the grain of the other one, not the glue. I would like to try hide glue in the future. Bellows papers printed from regular printer paper; an economical option, but a bit thin and subject to peeling off. Frames: Pine for the bellows, black walnut for the action frames. Used a disc sander to cut 60 degree bevels and joined them in an MDF "mold". This worked very well and produced strong frames, though the dimensions were a bit unequal due to mold quality. Would definitely use a mold again. The off-cut from splitting the leather for the bellows was used as "chamois leather" to seal the joint between the pine and walnut frames. Tung oil finish was used for the walnut ends. Reeds & Reedpan: Since reeds were from the out of tune piccolo section of an accordion, they needed to be solder-loaded to bring them down to pitch. Luckily, their size made them easy to fit into the reedpans, but the solder compromised a bit of response time. Not as much as one would think, though. The reedpan was of MDF and the reed slots were carved out. I decided to connect the reedpan to the action for simplicity. The reeds were waxed into place accordion-style, and I was quite pleased with the result. The only detriment I see from wax is having difficulty initially aligning the reeds, but it secures the reeds well. Action: Levers cut by hand from some thin metal, punched to form holes, and riveted to aluminum action posts using aluminum heat sink protrusions as rivets. This worked well, though the aluminum rivets were a bit hit-or-miss in holding the levers to the posts firmly. Springs made from paper clips, which were big and difficult to use, but worked well enough. I would use phosphor bronze wire in the future. The pads were thin wood, felt, and electrical tape. Very pleased with the electrical tape: thin, durable, and not as subject to corrosion over time like the leather in old concertinas. Would definitely use this again. Glued to the levers with superglue, which was fine. Maple buttons, which unfortunately turned a bit dark on the end grain after use.
-
Inner leakage when pressing some keys
charleschar replied to Vitto77's topic in Instrument Construction & Repair
For question no. 2, the problem may reside with the reeds themselves or the leathers rather than the valves. If much of the bellows' air is used when playing those three notes, the reed may be set too high above the brass plate. This may be the case if the reeds are especially quiet as well. Secondly, the leathers that cover the holes used by the opposite direction reeds may be missing or bent. This could result in quiet reeds and more air used than necessary.
