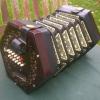
banjojohn Posted December 9, 2015 Share Posted December 9, 2015 (edited) Just managed to finish my reed tuning rig, complete with it's ex mountain board tyres as the bellows. Glad to say it works really well, generating plenty enough air flow for sounding/tuning purposes. The reed is supported on a changeable block, enabling different reed shoe sizes to be acommodated. The one shown here however, needs to be modified so as to be able to slide the reed out, without undoing the wing nuts... I didn't quite think this through when I made this first one. The reed shoe needs to be set at 90 degrees to the position shown here... The black square between the reed block the the Korg tuner is leather cut from an old glove for the one way valve (there is another one under the reed, to prevent pressure building under it). Edited December 9, 2015 by banjojohn Link to comment Share on other sites More sharing options...
Bruce Thomson Posted December 9, 2015 Share Posted December 9, 2015 Hi John - Thanks for posting this - I need a tuning rig myself, for an imminent major renovation of reeds of my battered Stagi tenor-treble. It would be good if you used a smart phone to take a few seconds of movie of the jig so we could see it working. If you do, post the link in this conversation. I'm pondering about what I should build, preferably compact, and continuous-stream rather than a puff type. I just found an interesting video on YouTube of a pro tuning reeds, showing all his equipment. See https://www.youtube.com/watch?v=GgYYyn72HLI I notice he's hammering without using ear protection, which will deafen him eventually. Also very interesting that he's using a belt sander for super-fast adjustments of pitch. To speed up the video you can click the right-click the cog at the bottom, and choose 2X speed or 1.5X speed, etc. Thanks again, Tomo Link to comment Share on other sites More sharing options...
Lester Bailey Posted December 10, 2015 Share Posted December 10, 2015 My only observation is that I would have mounted the reed holder 90 degrees around from where you mounted it. When tuning I always file along the length of the reed rather than across which seems to be the only direction available with your setup?? Link to comment Share on other sites More sharing options...
banjojohn Posted December 10, 2015 Author Share Posted December 10, 2015 (edited) My only observation is that I would have mounted the reed holder 90 degrees around from where you mounted it. When tuning I always file along the length of the reed rather than across which seems to be the only direction available with your setup?? Yes, I had already come to this conclusion, as I mentioned in my original post, however thanks for your interest and observations! So far I've only tuned 3 reeds with this apparatus, but I have removed the reed shoe from the wooden 'rails' before attempting to do the 'filing'. My wooden 'rails' which form the 'dove tail' slot are too thick to allow 'filing' when the reed shoe is slotted between them. I did think about planing them down so that they are the same thickness as the reed shoe, but decided against this as I was worried that they might lose their ability to hold the shoe quite as securely if I so reduced their thickness. Also, I was concerned about filing debris entering the air slot and being sucked into the bellows. I actually use very fine strips of wet and dry abrasive paper, which are glued to hardwood strips as my 'files'... Edited December 11, 2015 by banjojohn Link to comment Share on other sites More sharing options...
Stephen Selby Posted December 11, 2015 Share Posted December 11, 2015 I keep wondering whether it would be difficult to quickly make reed shoe holders of standard Lachenal or Wheatstone sizes using 3D printing? Has anyone tried? Link to comment Share on other sites More sharing options...
Theo Posted December 11, 2015 Share Posted December 11, 2015 Is 3D printing possible in brass? I've only seen it as a way of producing a pattern to use for lost wax casting. Link to comment Share on other sites More sharing options...
banjojohn Posted December 11, 2015 Author Share Posted December 11, 2015 (edited) I recently attended the public open day at the Science and Innovation Campus - Harwell Rutherford Appleton Laboratories, which is near Didcot, Oxfordshire. Whilst there I visited a 3D printing lab, where stainless steel components were being lazer printed! Basically they could make high precision engineering components, which would be impossible to make using any other more traditional manufacturing process.... I was most impressed. However, I think that Stephen was referring to reed shoe holders (not the actual reed shoe itself) and therefore brass would not be used for this. So I would say yes, if you have access to a 3D printer which can print plastic, then why not give it a try. I made the reed shoe holder for this tuning rig, by simply planing the edge of a strip of mahogany to the correct angle for the reed shoe dovetail. Then I cut off two pieces the right length for the reed shoe. I then placed the reed shoe in the correct position over the slot I had cut in the ply plate and with a little PVA glue, I glued down the two mahogany strips on either side of the shoe, squeezing them firmly against the shoe sides until the glue had 'gripped'. I then carefully slid the shoe out and removed any surplus glue which had squeezed out. I would say that this is an extremely simple and accurate way of making a reed shoe holder. When it is this easy to made in wood I can't really see the point of doing it with a 3D printer.... unless you just want to do it because you can! Edited December 11, 2015 by banjojohn Link to comment Share on other sites More sharing options...
banjojohn Posted December 14, 2015 Author Share Posted December 14, 2015 (edited) Hi John - Thanks for posting this - I need a tuning rig myself, for an imminent major renovation of reeds of my battered Stagi tenor-treble. It would be good if you used a smart phone to take a few seconds of movie of the jig so we could see it working. If you do, post the link in this conversation. Tomo Ok Bruce check this out at: https://youtu.be/ah9jCh-Oo0U Edited December 14, 2015 by banjojohn Link to comment Share on other sites More sharing options...
Jake Middleton-Metcalfe Posted December 14, 2015 Share Posted December 14, 2015 I have not seen a 3d printer with high enough tolerances to print things like reed carriers, all of the ones I ever saw or worked with gave a bit of a rough finish and it needed rubbing down. (I find this job occours with more regularity than I would like at work). Though that's not to say such machines are not out there Banjojohn I am very interested in seeing the 3d printing you are talking about. I have often wondered about this, the thing is you can get a great result out of a CNC router - as I understand this is how wakker concertinas reed holders are made? I think the 3d printing seems a bit behind and/or expensive in this regard. A good use of a 3d printer might be to have a very advanced bellows making jig printed - something really hard to make like an edeophone bellows jig (I imagine such things exist though I never saw them) Link to comment Share on other sites More sharing options...
banjojohn Posted December 14, 2015 Author Share Posted December 14, 2015 For a more detailed video showing a bit more of the process of tuning see: https://youtu.be/nliEPuMvwiI Link to comment Share on other sites More sharing options...
RWL Posted December 15, 2015 Share Posted December 15, 2015 How did you make the bellows for that? Is the bottom board on the bellows hinged to the back so you only pull down with one hand, or do you pull down on the board with two hands? Link to comment Share on other sites More sharing options...
Don Taylor Posted December 15, 2015 Share Posted December 15, 2015 Say you have an EC where the matching push and pull notes sound the same pitch when they are inside the concertina. What happens when you test those matching reeds on the tuning bellows? I understand that they will not sound exactly the same pitch as they would in the instrument, but do they both still sound the same as each other on the tuning bellows? Or do the push reeds consistently differ from the pull reeds? I ask because I have removed all of the reeds from one of my reed pans in order try to correct a warp in the pan. I stored the reeds in labelled boxes but I did not differentiate the pull reeds from the push reeds. Now I am wondering if I will have a problem figuring out which side the reeds should go back into. Link to comment Share on other sites More sharing options...
banjojohn Posted December 15, 2015 Author Share Posted December 15, 2015 (edited) Hi Don I do not believe that the pitch of a reed is affected in any significant way, by whether it is in the concertina or not, or whether it is fitted inside the reed pan or outside (in a chamber). I wouldn't worry too much about which sides they go back to. Though you may find slight differences in mechanical fit, ie; one reed shoe might seem a little loose in it's slot, where as it's partner may seem a little tight. If you do find this, then try swapping them, you might find they will fit better and the chances are that was the way they were originally fitted. Were you successful in removing the warp and if so how did you do it? Edited December 15, 2015 by banjojohn Link to comment Share on other sites More sharing options...
banjojohn Posted December 15, 2015 Author Share Posted December 15, 2015 (edited) How did you make the bellows for that? Is the bottom board on the bellows hinged to the back so you only pull down with one hand, or do you pull down on the board with two hands? The tyres are fixed together mechanically by small mild steel 'C' clips, which I cut from 0.9mm sheet with snips, then bent to shape using fine nose pliers, air sealing is by silicone rubber. Connection to the 'bench top' board, is done in a similar way, only using 'Z' clips, which are screwed from inside up into the lower face of the board. Connection of the lower board came next and of course have to be done by screwing externally. These bottom screws do not screw into the tyre wall, but into a 4mm plywood disc that is acting like a 'back to front wheel rim' inside the tyre wall. To get that ply disc in, it needed to be cut in two, the half pieces are small enough to go through into the tyre. Once in the tyre two halfs were then joined together and glued in place onto the inner wall. The lower plate was then screwed up to the ply disc. There are no hinges on the bottom plate and no I don't need two hands to push it up! I have found that I only need to sqeeze it up small fraction of it's range, in order to get the result shown in the video. There is no need to pull down on the bottom board, the spring of the tyres and gravity does this... Edited December 15, 2015 by banjojohn Link to comment Share on other sites More sharing options...
Don Taylor Posted December 15, 2015 Share Posted December 15, 2015 Were you successful in removing the warp and if so how did you do it? I dont know yet, but it is promising so far. I have it clamped to a flat surface in a well hydrated atmosphere. I need to replace some end bolts and a missing end bolt insert before I can try it out. But there are lots of other issues to work on. I expect that I will need a tuning rig too so thanks for this information and the videos. Link to comment Share on other sites More sharing options...
RWL Posted December 15, 2015 Share Posted December 15, 2015 What type of tires are those and where did you get them? I'm surprised that they'd be flexible enough to act as a bellows. Link to comment Share on other sites More sharing options...
Chris Ghent Posted December 15, 2015 Share Posted December 15, 2015 Were you successful in removing the warp and if so how did you do it?I dont know yet, but it is promising so far. I have it clamped to a flat surface in a well hydrated atmosphere. I need to replace some end bolts and a missing end bolt insert before I can try it out. But there are lots of other issues to work on. I expect that I will need a tuning rig too so thanks for this information and the videos. If this doesn't work, get a thin piece of material, a worn sheet for example, dampen it (less is better) and put it between the concave side of the wood and the flat surface. It will flatten out within a day or so. Link to comment Share on other sites More sharing options...
Chris Ghent Posted December 15, 2015 Share Posted December 15, 2015 (edited) Hi DonI do not believe that the pitch of a reed is affected in any significant way, by whether it is in the concertina or not, or whether it is fitted inside the reed pan or outside (in a chamber). I wouldn't worry too much about which sides they go back to. Though you may find slight differences in mechanical fit, ie; one reed shoe might seem a little loose in it's slot, where as it's partner may seem a little tight. If you do find this, then try swapping them, you might find they will fit better and the chances are that was the way they were originally fitted. My experience has been the valve creates more pitch drop on the draw side, not by much but noticeable. The mechanical fitting method is where I would start though, and it will probably need a tune anyway and that will clear up any discrepancies. Edited December 15, 2015 by Chris Ghent Link to comment Share on other sites More sharing options...

Recommended Posts
Create an account or sign in to comment
You need to be a member in order to leave a comment
Create an account
Sign up for a new account in our community. It's easy!
Register a new accountSign in
Already have an account? Sign in here.
Sign In Now