Mark Rosenthal Posted July 3, 2014 Share Posted July 3, 2014 I recently got a new (old) English concertina that's one of the best I've ever owned. It's an ebony-ended Tenor-Treble Wheatstone Aeola manufactured in 1924. It has a couple of problems, and I'm hoping the members of this forum can give me some advice on how to fix them. Over the years I've done basic tasks on my other concertinas - things like changing valves, pads, and replacing springs. But I've never before had to deal with the problems below. Since this is a vintage instrument from Wheatstone's best period, I plan to take a very conservative approach. Unless I'm completely confident that I can do the repair myself, I'll have it done by a repair person experienced in working on concertinas of traditional English design. But even if I do have someone else do some of the work, I'd still like to understand what the various options are for dealing with the problems.At the moment it has two significant problems.PROBLEM #1: HAIRLINE CRACKS IN THE PAD-PAN (Click on the thumbnails to view the full-size images) In spite of these cracks, this instrument is one of the tightest and most responsive concertinas I've ever owned. The cracks don't seem to be having any effect whatsoever on the playability of the instrument. And the cracks are so narrow that if I wanted to try to glue the cracks, wood glue would just sit on top of the wood and not go into the cracks.How would you approach repairing this? Or, considering that it doesn't seem to be causing any perceptible problem with playing the instrument, would I be better off leaving it alone?PROBLEM #2: CORROSION ON THE BUTTONS AND LEVER ARMS (Click on the thumbnails to view the full-size images)The buttons are wood underneath covered by metal caps - nickel-silver I believe. The portion of the metal caps visible on the outside of the ebony ends is in good shape, and the sides of the buttons, where they go through the felt bushing, are polished from sliding against the felt. But the part of the metal cap that's completely inside the ebony end is covered with some sort of light green corrosion. The lever arms also have some similar-looking corrosion.This problem also doesn't seem to be affecting the playability of the instrument, but it seems like it really ought to be cleaned up.I'd appreciate any suggestions on how to approach cleaning the buttons and lever arms. -- Mark Rosenthal Link to comment Share on other sites More sharing options...
Geoff Wooff Posted July 3, 2014 Share Posted July 3, 2014 (edited) It looks as if you have Verdigris on your metal parts. This is a sort of corrosion that affects Copper based alloys and can eventually eat away at the metal. It appears to be caused by salt or acid in the air. If your concertina was played near the Sea or on board ship or by a person with a high acid sweat content... or perhaps someone who ate a lot of Fish and Chips with vinegar and salt (joke)... Most old concertinas will have some Verdigris on the metal buttons. There are various ways to remove Verdigris , a seach on the web could be interesting. I use a cloth lightly soaked in vinegar for getting the stuff off the buttons. How you would clean the levers ? A tiny wire brush followed by a tooth brush and vinegar... perhaps.?? Hmmm.. could be messy! Edited July 3, 2014 by Geoff Wooff Link to comment Share on other sites More sharing options...
Mark Rosenthal Posted July 3, 2014 Author Share Posted July 3, 2014 It looks as if you have Verdigris on your metal parts. This is a sort of corrosion that affects Copper based alloys and can eventually eat away at the metal. It appears to be caused by salt or acid in the air. If your concertina was played near the Sea or on board ship or by a person with a high acid sweat content... or perhaps someone who ate a lot of Fish and Chips with vinegar and salt (joke)... Most old concertinas will have some Verdigris on the metal buttons. There are various ways to remove Verdigris , a seach on the web could be interesting. I use a cloth lightly soaked in vinegar for getting the stuff off the buttons. How you would clean the levers ? A tiny wire brush followed by a tooth brush and vinegar... perhaps.?? Hmmm.. could be messy! Thanks for the suggestion. I just googled "remove verdigris" and most of them suggested cleaning the object with vinegar, as you did. There's one thing I don't understand: If verdigris is created when a copper alloy comes into contact with acid, how does it make sense to clean it with an acid like vinegar? Link to comment Share on other sites More sharing options...
Chris Ghent Posted July 3, 2014 Share Posted July 3, 2014 Cleaning it to remove corrosion makes sense but fixing the cracks seems unnecessary if they are not a problem. Link to comment Share on other sites More sharing options...
Geoff Wooff Posted July 3, 2014 Share Posted July 3, 2014 (edited) It looks as if you have Verdigris on your metal parts. This is a sort of corrosion that affects Copper based alloys and can eventually eat away at the metal. It appears to be caused by salt or acid in the air. If your concertina was played near the Sea or on board ship or by a person with a high acid sweat content... or perhaps someone who ate a lot of Fish and Chips with vinegar and salt (joke)... Most old concertinas will have some Verdigris on the metal buttons. There are various ways to remove Verdigris , a seach on the web could be interesting. I use a cloth lightly soaked in vinegar for getting the stuff off the buttons. How you would clean the levers ? A tiny wire brush followed by a tooth brush and vinegar... perhaps.?? Hmmm.. could be messy! Thanks for the suggestion. I just googled "remove verdigris" and most of them suggested cleaning the object with vinegar, as you did. There's one thing I don't understand: If verdigris is created when a copper alloy comes into contact with acid, how does it make sense to clean it with an acid like vinegar? Well yes that does appear to be a little odd. You could use good a good old fashioned metal polish of course, but perhaps Vinegar is less messy ? Regarding your Padboard cracks; could these be due to a warp of the board or of the Reedpan ? The only usual other cracking along the grain would be due to shrinkage. It should be possible to stabilise those cracks using a very thin glue that will run into the tiny gaps if that would make you feel more secure about the situation... otherwise I agree with Chris. Edited July 3, 2014 by Geoff Wooff Link to comment Share on other sites More sharing options...
Don Taylor Posted July 3, 2014 Share Posted July 3, 2014 Geoff suggested using a very thin glue. There is a product used for boat repairs called 'Captain Tolley's Creeping Crack Cure' - http://www.captaintolley.com I don't know if it is appropriate for this application, but it certainly can find its way deep inside tight cracks in wood on boats. Link to comment Share on other sites More sharing options...
Alex West Posted July 3, 2014 Share Posted July 3, 2014 The verdigris often occurs when leather (eg the handstraps) is in contact with metal (eg the scerws/washers etc) on concertinas. It;s unsightly and sticky and is I (I've been told) poisonous. I often use a glass fibre pen - used for cleaning electrical circuit boards - to clean brass levers. This treatment is only very mildly abrasive but use gloves otherwise the bits of glass fibre can get into your skin and cause irritation. For the cracks in the wood, as Chris says, if they aren't affecting the air-tightness, then don't worry too much. Given the humidity changes in the USA rather than in the UK, it's likely that the cracks are due to the wood drying out - which it will in time anywhere in the world as the dead wood ages but which is probably exacerbated in the US. Some US concertinists keep their instruments in controlled humidity environments (you may be able to find this in other threads). If you really want to seal the cracks, you could use Chair Doctor which I believe is marketed by Veritas in the US (certainly in Canada). It's a very thin aliphatic resin which swells the wood slightly as it sets thus closing the smaller gaps, gets into very thin cracks through capillary action and sets in an hour or so. You could also consider a very thin superglue. This might sound like heresy, but it does work. It's not reversible, but why would you want to reverse this sort of crack? Alex West Link to comment Share on other sites More sharing options...
Mark Rosenthal Posted July 4, 2014 Author Share Posted July 4, 2014 Regarding your Padboard cracks; could these be due to a warp of the board or of the Reedpan ? I examined the side of the padboard that faces the reed pan by holding it against a straight-edge and looking to see if I could see any light between the two. With the straight edge parallel to the grain of the wood, the padboard appears perfectly flat. With the straight edge perpendicular to the grain, I could see a tiny sliver of light between the two. To measure the distance between the two, I made a stack of several small slips of paper and placed them between the two at the point where the sliver of light had been. Initially the straight edge rocked slightly, which told me that the stack of paper was the high point. I removed one slip of paper at a time until the straight edge no longer rocked, which meant that the stack of paper exactly filled the space. I then measured the thickness of the stack with vernier calipers. The result: 24 thousandths of a inch. This doesn't strike me as a significant deviation from flat. Just for comparison, the thickness of the chamois on top of the chamber walls on the reedpan is 70 thousandths. I also examined the side of the reed pan that faces the padboard by holding it against a straight-edge. Since this is the side of the reedpan with chamber walls topped by chamois, I held the straight edge along the tops of several of the chamber walls. As near as I could tell, all of them are perfectly straight. I did this test on both ends and found pretty much the same results. On the other end, the largest space between the padboard and the straight-edge was 26 thousandths, pretty close to the 24 thousandths I'd measured on the other side. Link to comment Share on other sites More sharing options...
Mark Rosenthal Posted July 4, 2014 Author Share Posted July 4, 2014 I often use a glass fibre pen - used for cleaning electrical circuit boards - to clean brass levers. This treatment is only very mildly abrasive but use gloves otherwise the bits of glass fibre can get into your skin and cause irritation. Is http://www.amazon.com/K-Tool-International-KTI70550-Sanding-Pen/dp/B000FN8H52 the sort of pen you have in mind? Also, if microscopic glass fragments break off of this sort of pen, wouldn't cleaning the lever arms leave you with a nasty mixture of microscopic glass fragments and verdigris particles on the action board? Even if it's not visibly obvious, if that material is left there, it could get all over other parts inside the button box. If it's not cleaned up, it seems that the next time someone opens it, they're not going to expect that they need to wear gloves, and they'd get it all over their fingers. So it seems like it would be absolutely critical to clean it up before reassembling the instrument. But I have no idea what would be a sufficiently effective way to clean the microscopic debris. Do they make itty-bitty vacuum cleaners for purposes like this? How would you clean up the debris? Link to comment Share on other sites More sharing options...
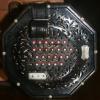
JohnSmith Posted September 22, 2014 Share Posted September 22, 2014 I have these exact two problems on my Wheatstone. I am doing a complete overhaul of the internal parts so my solutions might be a little different given that I will have the pads and buttons out. For the pad board cracks. I can't remember where I read it (probably Dave's book) but the solution was to first put a strip of tape across one side of the pad board. Then line each of the concerned air ways with tape/plastic/baking paper or anything that isn't likely to stick to the glue too easily. Then simply fill the cracked space with superglue. It's thin and will thus pour in easily. After completion simply remove the tape and carefully clean up any excess that has fouled the airway or pad board surfaces. For larger cracks the suggestion was to cut the cracks larger and glue in new timber. I won't be going this route. My board is pictured below. As for the verdigris. the Lachenal crowd have it easy here I'm told with the removable lever arms. Dremel make small felt polishing bits. This with a little polishing compound should bring most of the muck off. I will be doing plenty of testing first before I attack my instrument of course. The pivot has me worried a little. I might simply use the more pointed tip version to carefully do it and then floss the pivot joint with some cotton or fishing braid. I'm not quite sure how yet but I will be covering the action board somehow and using a small vacuum cleaner (or my extractor) to try to keep the area as clean as possible. As I said, I'm doing a full rebuild so I will brush everything out and clean it all before I put new pads in. 0000 steel wool would also do the job but be a little messy. Link to comment Share on other sites More sharing options...
d.elliott Posted September 22, 2014 Share Posted September 22, 2014 Padboard cracks are a result of woods drying out and shrinking at different rates and in different directions, here the padboard edges are locked to the action box frame, and the shrinkage on the padboard is 90 degrees across the board's grain direction. the line of pad holes is the obvious week point and hence the cracking. Your concertina has a good tight grained wood in it's padboard, and is now stable. The thing is to fill the gaps to ensure no steps in the underside of the padboard and no air leakage paths. In cases of gross cracking you can see light through and you end up cutting out the cracks and inlaying wood to make up the board's loss in across grain width.in the case of hairline cracks like this it is not necessary to cutting out wood. You only need to stabilise the area, and seal against the potential of an air path. I rub in PVA wood glue both sides of the crack. let it dry and then lightly sand and repeat. John is referring to the use of a wood filler and sellotape to fill notches around pad holes that prevent a pad from sitting & sealing Dave Link to comment Share on other sites More sharing options...
d.elliott Posted September 22, 2014 Share Posted September 22, 2014 The verdigris issue: please don't use any fluids , the only way is to work them free manually and dust/ vac the debris up, or remove the action assembly from the action plate, which is then fraught with a thousand other issues. If you remove the brasswork, you can then pickle away in vinegar or other medium to your heart's content. you will not be washing the muck onto the woodwork and wetting it all. Instead of using fibre glass in the contact cleaning pencil, you could use the refills with fine brass wire, no fibre glass irritation, less dust and a better cleaning effect. most of what you are seeing sits in fresh air, it harms nothing. It cannot even be seen. It i probably the result of the products of combustion from open coal fires decades ago. It is effectively stable, so why risk damage to the action? A light mechanical FUNCTIONAL clean will see your life out, and your descendants as well. On the keys, again use nothing whatsoever wet. I polish the dirt off with a bit of chamois leather, finally buffing with a silver polish cloth. Not wadding. The wooden key bodies are delicate and you do not want them wet or contaminated. If the contamination is very greasy and extensive, you may need to look at the bushings in the bushing board (metal ended) and the cross bushings in the keys. The dampers will be a function of condition and key height above the metal end when the key is pressed full down Dave Link to comment Share on other sites More sharing options...
Alex West Posted September 22, 2014 Share Posted September 22, 2014 MArk My apologies for not seeing your response earlier but the pencil I had in mind was like this one http://www.amazon.com/Scratch-Brush-Fiberglass-Colors-vary/dp/B0019V18D2/ref=pd_sbs_indust_2?ie=UTF8&refRID=0HR0ERGNMV9XXQ6VM0BM. You certainly have to clean up after yourself and the fubreglass bits are definitely irritating but I've not seen a problem or any residue after I've finished or when I've opened up boxes again after some time. You can get 2 different diameters of pencil & replacement tips for coarse and finer work. I haven't tried the brass refills which Dave suggests. I've got some but not used them in anger Alex West Link to comment Share on other sites More sharing options...
david robertson Posted September 28, 2014 Share Posted September 28, 2014 Personally, I find the easiest way to clean up buttons is to stick the guide pin in the chuck of a Dremel (other craft drills are available) and spin it in the gentle grip of a Brasso'd rag. The only downside is the foul, sulphurous smell that now comes free with every tin of Brasso. Link to comment Share on other sites More sharing options...
Mark Rosenthal Posted October 13, 2014 Author Share Posted October 13, 2014 Personally, I find the easiest way to clean up buttons is to stick the guide pin in the chuck of a Dremel (other craft drills are available) and spin it in the gentle grip of a Brasso'd rag. The only downside is the foul, sulphurous smell that now comes free with every tin of Brasso. I've been told the wooden part of the button is pretty fragile. So I'd be afraid to spin the button by clamping its guide pin in the chuck of any electric drill. I've got 56 buttons to do this to. If I was unlucky on only one of them, I'd have a real problem on my hands. Link to comment Share on other sites More sharing options...
Mark Rosenthal Posted October 13, 2014 Author Share Posted October 13, 2014 The dampers will be a function of condition and key height above the metal end when the key is pressed full down I followed what you were saying right up till this point. But I'm not sure what this sentence means. What are "the dampers"? Link to comment Share on other sites More sharing options...
SteveS Posted October 13, 2014 Share Posted October 13, 2014 The dampers are the little circles of felt that live on the bottom end of each button. There are frequently two of them (sometimes 1 or 3). They help dampen the end travel of the button when fully depressed. It is usual practice to replace these with 2 new dampers before adjusting the action for height. I believe Dave's book (well worth getting if you haven't got it already) gives a good description of how to adjust the action travel. Link to comment Share on other sites More sharing options...
d.elliott Posted October 13, 2014 Share Posted October 13, 2014 The dampers will be a function of condition and key height above the metal end when the key is pressed full down I followed what you were saying right up till this point. But I'm not sure what this sentence means. What are "the dampers"? The ICA have just published a special edition newsletter which is a full nomenclature and description of concertina parts and the various sub assemblies down to component level, you might find this useful in naming and locating the various bits in a box. Dave E Link to comment Share on other sites More sharing options...

Recommended Posts
Create an account or sign in to comment
You need to be a member in order to leave a comment
Create an account
Sign up for a new account in our community. It's easy!
Register a new accountSign in
Already have an account? Sign in here.
Sign In Now