Łukasz Martynowicz Posted July 8, 2021 Author Share Posted July 8, 2021 A question for the c.net collective mind: in a rather heated discussion on facebook group, Goran Rahm (known around here more than a decade ago from what I gather) has stated, that this type of handle design had been proposed earlier by Michael Bell in Concertina World 421 Nov 2001 (with drawings) and later in an article here on c.net (with photos). I have found the relevant link in this thread but the link is sadly no longer active and I can't find Concertina World article either. Does anyone here know where can I find drawings or photos of Michael's design? Just curious how close our concepts are. Link to comment Share on other sites More sharing options...
David Barnert Posted July 9, 2021 Share Posted July 9, 2021 2 hours ago, Łukasz Martynowicz said: Does anyone here know where can I find drawings or photos of Michael's design? Internet Archive (Wayback Machine) to the rescue. http://web.archive.org/web/20101229113655/http://www.concertina.net/mb_handle.html Link to comment Share on other sites More sharing options...
Łukasz Martynowicz Posted July 9, 2021 Author Share Posted July 9, 2021 44 minutes ago, David Barnert said: Internet Archive (Wayback Machine) to the rescue. http://web.archive.org/web/20101229113655/http://www.concertina.net/mb_handle.html Thank you! Just as I thought, it's a completely different beast. Link to comment Share on other sites More sharing options...
David Barnert Posted July 9, 2021 Share Posted July 9, 2021 25 minutes ago, Łukasz Martynowicz said: Thank you! Just as I thought, it's a completely different beast. Of course, 3D printing was not available in 2002 except in a primordial sense. Link to comment Share on other sites More sharing options...
Łukasz Martynowicz Posted July 9, 2021 Author Share Posted July 9, 2021 8 hours ago, David Barnert said: Of course, 3D printing was not available in 2002 except in a primordial sense. I was thinking not about manufacturing method, but the underlying principle, because Goran's claim was that my design was "nothing new". As it turns out however, even the goals of Michael's design were entirely different. Thanks again for providing the link. Link to comment Share on other sites More sharing options...
David Barnert Posted July 9, 2021 Share Posted July 9, 2021 Perhaps you’re getting a sense of why GR is no longer present in this forum. 2 Link to comment Share on other sites More sharing options...
soloduet Posted July 11, 2021 Share Posted July 11, 2021 Thank you Lukasz for the nice work and not give up. When you will complete the instrument I'd like to try it. Is it also possible to adapt your handle to other concertinas? Link to comment Share on other sites More sharing options...
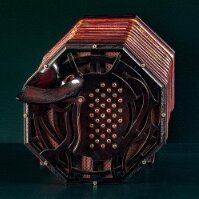
Łukasz Martynowicz Posted January 23, 2022 Author Share Posted January 23, 2022 Hopefully, this is my penultimate post before completion, as the box is fully playable for a few months now and only bellows papers left to do. Playability is in fact the reason why it is not done yet - I prefer playing on her in my precious little time I can spare for concertina. So, to the point. In another thread I've mentioned, that I've solved the links problem. My first prototype link all those years ago involved traditional levers, but it has proven impossible to route direct levers through the array and routing them around required so many intermediaries, that there was just too much loss of travel and response. And then occurred to me, that I could go through the inside of the box for a direct route and this is how I did it. Those are for Ebs, and if I knew this will be my solution I would arrange a few reeds differently to accommodate Abs also (at this point I could readily make one Ab link, but I don't see the musical point of just one). Bowden setup has all the advantages I can think of - it is smooth, PTFE tube+spring wire have virtually no friction, so no additional spring is needed; button travel is exactly the same, because lever arm length is the sam for both buttons; and with my button-to-lever connection design, the "donor" button does not move when the receiving button is pressed; and last but not least, there are no meaningful button force differences, so linked buttons work pretty much exactly the same as the rest of the array. With careful planning of the reed placement, I could get full range of enharmonic duplicates this way. I guess this is a "to do" for my future full piano range box, somewhere in the next two decades 4 Link to comment Share on other sites More sharing options...
Łukasz Martynowicz Posted January 23, 2022 Author Share Posted January 23, 2022 Now on the second photo above one other feature can be seen - my air pad box. This is why it looks this way - my air lever. Because my "antlers" immobilise the thumb, I needed something different than a traditional air button. This can be operated by any of the four fingers and as such can be operated mid-phrase to close/open bellows faster. Though I only use it in one tune, because this beast have enormous air supply. Which points to a fun fact - with the bellows perfectly airtight, this box can play the lowest note, F2, continuously for 30 seconds. But because DIX reeds with the valves I use are so responsive and the bellows cross section is so large on this box, I actually had to introduce a controlled leak between the bellows and the reedpan to get a proper dynamic range for reeds above C4, because they were pretty much on-off with the slightest of the bellows move. The last update for now is my lap support. This ensures, that the LH side hand positioning stays absolute, as it eliminates any wobble around the vertical axis due to eccentricity of forces acting on the endplates on draw and anchores the LH side of the bellows. By the nature of my bellows (it is very rigid in both axis perpendicular to the bellows travel) it also stabilises the RH side, so this whole thing feels much more like playing on a static instrument like a piano rather than a concertina with a hand strap. It is a click-in mount, so there is only a little peg on the concertina itself. Link to comment Share on other sites More sharing options...
Don Taylor Posted January 23, 2022 Share Posted January 23, 2022 1 hour ago, Łukasz Martynowicz said: And then occurred to me, that I could go through the inside of the box for a direct route and this is how I did it Brilliant! Simple and ingenious, using Bowden cables like this should be taken up by other makers. 1 Link to comment Share on other sites More sharing options...
Łukasz Martynowicz Posted January 23, 2022 Author Share Posted January 23, 2022 29 minutes ago, Don Taylor said: Brilliant! Simple and ingenious, using Bowden cables like this should be taken up by other makers. Thanks! It was one of those "how have I not thought about it sooner" moments. I don't mind others taking up on this, as I don't see myself in a concertina building career anytime soon. Maaaybee some 3d printed 46 button Haydens if I ever design a travel box for myself. Link to comment Share on other sites More sharing options...
dabbler Posted January 23, 2022 Share Posted January 23, 2022 (edited) Very nice linkage solution. I wonder what the lifespan of the Bowden cables is. I suppose they could be made replaceable if it is an issue. I'm also impressed with the finish on the handles. Is that stained wood-fill PLA? -George Edited January 23, 2022 by dabbler Link to comment Share on other sites More sharing options...
Łukasz Martynowicz Posted January 23, 2022 Author Share Posted January 23, 2022 10 minutes ago, dabbler said: Very nice linkage solution. I wonder what the lifespan of the Bowden cables is. I suppose they could be made replaceable if it is an issue. I'm also impressed with the finish on the handles. Is that stained wood-fill PLA? -George Those are PTFE, which from I can gather has an unlimited shelf life. With this curvature I suppose there won't be any serious wear on those. But if any part of the link breaks, it is simply push fit into the board with a little notch cut on the button side so it does not slide back in. To completely replace the whole assembly you just need an exacto knife and a piece of tube for the Bowden and a pair of pliers and a proper gauge spring wire for the actuator. I have actually replaced those a few times when I was working on them, since I made them too short the first time around and the resulting curvature was too tight. It took about 2 minutes to replace them. Link to comment Share on other sites More sharing options...
Łukasz Martynowicz Posted January 23, 2022 Author Share Posted January 23, 2022 29 minutes ago, dabbler said: I'm also impressed with the finish on the handles. Is that stained wood-fill PLA? -George Yes, this is Fiberlogy Fiberwood filament, alcohol stained with a shellac finish. A very nice filament, one of my personal favourites. 1 Link to comment Share on other sites More sharing options...
Owen Anderson Posted January 24, 2022 Share Posted January 24, 2022 I'm not going to claim to really understand how your "antlers" system works, but I was curious why you're choosing to immobilize the thumb in a downwards-pointing position? It seems like holding the thumb in a bent position like that for an extended period would be painful. Would it be possible to achieve the same effect with the thumb pointed straight, but still in a thimble? Link to comment Share on other sites More sharing options...
Łukasz Martynowicz Posted January 24, 2022 Author Share Posted January 24, 2022 (edited) 6 hours ago, resistor said: I'm not going to claim to really understand how your "antlers" system works, but I was curious why you're choosing to immobilize the thumb in a downwards-pointing position? It seems like holding the thumb in a bent position like that for an extended period would be painful. Would it be possible to achieve the same effect with the thumb pointed straight, but still in a thimble? There is a very good reason for this orientation, but first I want to stress one thing - this whole setup is aimed at relaxing the hand as much as possible, so no, there is no pain involved, at all. The main concept behind this handle design is based on the same principle as rock climbing chock techniques - because of how the thimble, anvil and handlebar parts of this system interact, the thumb is locked in all planes but one (plus the leeway described below) and in all axis of rotation but two. Because of this, the hand is effectively attached to the concertina in a very "glove like" fashion, with all positioning absolute and all lateral thumb movements directly transferring to the bellows movement. You mount/dismount your hand by a move that does not naturally happen when playing but when locked in the hand simply rests, hanging from the thimble in the same position you hook the thumb on e.g. backpack straps when you want to rest your arms, or on a jacket button etc... For the handle to act as described above, it must be rigid. Any elasticity reduces the absolute nature of finger positioning. Now the main reason why the thumb has to be oriented this way is that in order to reach various areas on the keyboard in finger configurations required by Hayden chord shapes, the thumb must rotate a bit. The thimble is oriented exactly along this axis of rotation. A rigid handle like this, if made with the thumb straight wants to literally break your thumb as you try to reach extremes of the array and even if it didn't you'll loose the hook-and-lock aspect of the handle. During prototyping this I gradually expanded the concept from a simple, english style thumb "strap" (only made from rigid filament) and then iterated it about 20 times to the final shape you see here. There is a short video on the previous page of this thread when I present how the lock aspect of this handle works and how the movement is transferred onto the bellows, and in the final seconds od the video you can see the unlock move. Now, the common confusion I got about this thumb position is that it is a 90 degree bend. It isn't - it varies between close and far rows fingering and the thimble is not "snug fit" vertically, you can move the distal part of the thumb enough for all movements required. In the "ready" position of the thimble there are two forces acting, one upward acting near the joint and one downward acting at the tip of the nail. Then when playing those forces vary, both in direction and strength, so there is very little fatigue. After a 45 minute session my hand is more relaxed than after playing the same time with a hand strap setup on my CC Elise. This is mostly because my handle design does the gripping for you. Edited January 25, 2022 by Łukasz Martynowicz Link to comment Share on other sites More sharing options...
chris rowe Posted January 25, 2022 Share Posted January 25, 2022 Brilliant ! Link to comment Share on other sites More sharing options...
Dashy Posted January 25, 2022 Share Posted January 25, 2022 22 hours ago, Łukasz Martynowicz said: There is a very good reason for this orientation, but first I want to stress one thing - this whole setup is aimed at relaxing the hand as much as possible, so no, there is no pain involved, at all. The main concept behind this handle design is based on the same principle as rock climbing chock techniques - because of how the thimble, anvil and handlebar parts of this system interact, the thumb is locked in all planes but one (plus the leeway described below) and in all axis of rotation but two. Because of this, the hand is effectively attached to the concertina in a very "glove like" fashion, with all positioning absolute and all lateral thumb movements directly transferring to the bellows movement. You mount/dismount your hand by a move that does not naturally happen when playing but when locked in the hand simply rests, hanging from the thimble in the same position you hook the thumb on e.g. backpack straps when you want to rest your arms, or on a jacket button etc... For the handle to act as described above, it must be rigid. Any elasticity reduces the absolute nature of finger positioning. Now the main reason why the thumb has to be oriented this way is that in order to reach various areas on the keyboard in finger configurations required by Hayden chord shapes, the thumb must rotate a bit. The thimble is oriented exactly along this axis of rotation. A rigid handle like this, if made with the thumb straight wants to literally break your thumb as you try to reach extremes of the array and even if it didn't you'll loose the hook-and-lock aspect of the handle. During prototyping this I gradually expanded the concept from a simple, english style thumb "strap" (only made from rigid filament) and then iterated it about 20 times to the final shape you see here. There is a short video on the previous page of this thread when I present how the lock aspect of this handle works and how the movement is transferred onto the bellows, and in the final seconds od the video you can see the unlock move. Now, the common confusion I got about this thumb position is that it is a 90 degree bend. It isn't - it varies between close and far rows fingering and the thimble is not "snug fit" vertically, you can move the distal part of the thumb enough for all movements required. In the "ready" position of the thimble there are two forces acting, one upward acting near the joint and one downward acting at the tip of the nail. Then when playing those forces vary, both in direction and strength, so there is very little fatigue. After a 45 minute session my hand is more relaxed than after playing the same time with a hand strap setup on my CC Elise. This is mostly because my handle design does the gripping for you. I just gotta say, I'm really glad you decided to make that concertina, because I'm super excited to try this out! (whenever you make a release version, no rush...) The more you say about it the more excited I get. Link to comment Share on other sites More sharing options...

Recommended Posts
Create an account or sign in to comment
You need to be a member in order to leave a comment
Create an account
Sign up for a new account in our community. It's easy!
Register a new accountSign in
Already have an account? Sign in here.
Sign In Now