Marcus Posted November 19, 2011 Share Posted November 19, 2011 I was wondering if anyone has any experience ebonizing the end plates for the clover kit. I just ordered my kit from Bob Tedrow and can't wait to start assembling my own concertina. Any carpenters out there willing to share? Link to comment Share on other sites More sharing options...
Geoff Wooff Posted November 20, 2011 Share Posted November 20, 2011 (edited) You could 'Google' "ebonizing wood". There are plenty of suggestions to be found there.. different recipes depending on the type of wood to be ebonized. Try them on a scrap piece of the same type of timber first, of course. I use Ebony all the time but very rarely have I tried to match another type of wood to the real stuff but I recall trying to do it with Sulphuric acid, though I would not recommend that.. not very safe. Black Permanent Ink will do for some timbers, finnished with a varnish or Black French Polish. Good luck with your kit, Geoff. Edited November 20, 2011 by Geoff Wooff Link to comment Share on other sites More sharing options...
SteveS Posted November 20, 2011 Share Posted November 20, 2011 (edited) I was wondering if anyone has any experience ebonizing the end plates for the clover kit. I just ordered my kit from Bob Tedrow and can't wait to start assembling my own concertina. Any carpenters out there willing to share? Use a combination of the following: 1) use black stain (spirit based) on the prepared wood - a couple of generous coats with a soft brush will do it - let dry thoroughly between coats. 2) French polish with black shellac - make your black shellac: prep a 2lb cut of shellac - add the black stain in the proportions of 1 stain to 3 shellac - use the 2lb cut shellac as your stock, and then later use a 1lb cut as the glaze. You may need to experiment with the proportions of stain/shellac. ** Most important: practice on some scrap first - check you get the finish you're after. ** Hope this helps. Lets us know how you get on, and maybe post some pics. Steve Edited November 20, 2011 by SteveS Link to comment Share on other sites More sharing options...
Marcus Posted December 21, 2011 Author Share Posted December 21, 2011 The kit arrived yesterday and we picked it up from the post office today. I can't wait to start assembling it, but have to get Christmas and New Year out of the way first. I'm thinking of keeping a photo journal to document the process of building the kit and will surely post when complete (if I manage it!). I can't recommend Concertina Connection enough. Karen and Wim Wakker had this delivered to me with custom bellows in less than half the time originally indicated. I hope I can do them justice by building the instrument! Link to comment Share on other sites More sharing options...
Andy Holder Posted December 21, 2011 Share Posted December 21, 2011 The kit arrived yesterday and we picked it up from the post office today. I can't wait to start assembling it, but have to get Christmas and New Year out of the way first. I'm thinking of keeping a photo journal to document the process of building the kit and will surely post when complete (if I manage it!). I can't recommend Concertina Connection enough. Karen and Wim Wakker had this delivered to me with custom bellows in less than half the time originally indicated. I hope I can do them justice by building the instrument! It sounds like just the sort of project for a Christmas holiday! I'm interested to know what the reeds are in the kit? Andy. Link to comment Share on other sites More sharing options...
Marcus Posted December 21, 2011 Author Share Posted December 21, 2011 The reeds are Italian "a mano" accordion reeds. Can't wait to get started! Link to comment Share on other sites More sharing options...
Ken_Coles Posted December 22, 2011 Share Posted December 22, 2011 Have fun. I documented my effort with photos too, but haven't posted them here yet...it took me a whole summer, but the result was great after some tweaking (I got very good at finding and fixing air leaks, mostly crooked pads, and finally got them all sorted). Can't wait for Wim to do a G/D kit (but he has stated here that an EC comes first). Ken Link to comment Share on other sites More sharing options...
ceemonster Posted December 23, 2011 Share Posted December 23, 2011 could one just tung-oil the kit clover for a "natural" look? Link to comment Share on other sites More sharing options...
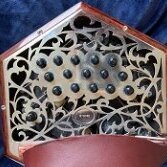
Bender Posted January 1, 2012 Share Posted January 1, 2012 I have just now completed the process of ebonizing a Clover kit with india ink. I love the resulting color, and the fact that nothing more inimical than water and soot was involved. However, because water was involved, the grain was raised, i.e. instantly devolved from its smooth sanded state to a very rough texture indeed. I like the rougher texture, but if you want a traditional smooth finish, you can wet the pieces beforehand, sand them smooth again, and proceed with the ink. I am told that there werewolf-like transformation of the grain happens only once. Link to comment Share on other sites More sharing options...
Marcus Posted January 1, 2012 Author Share Posted January 1, 2012 How about a picture? How did you apply the india ink? Are you going to wax it to finish it off? Link to comment Share on other sites More sharing options...
shelly0312 Posted January 1, 2012 Share Posted January 1, 2012 so.....Ken might want to visit Marcus (just backtracked to his profile=Bermuda?!?) and do some sort of collabrative photo essay on "the makings of a Clover"; we are all anxious to see--and appreciate others labors of love. Ken, at least post a completed project pic! (or did I miss that along the way?) Michelle Link to comment Share on other sites More sharing options...
Ken_Coles Posted January 1, 2012 Share Posted January 1, 2012 I hear you Michelle...I am several thousand km from my home computer, but I think I have the memory chip that holds those photos with my camera. I'll have a look! I'm sure it won't take more than a week to upload the photos over a phone modem. Said concertina has gotten a lot of playing this week, by the way. The reeds really were set pretty well the way Wim sent them, and the tone is very nice, since my wife has broken them in so well over the past year. Ken Link to comment Share on other sites More sharing options...
Marcus Posted January 1, 2012 Author Share Posted January 1, 2012 Any concertina related visitors are welcome in Bermuda! I'm sure I could find somewhere to put you up! Link to comment Share on other sites More sharing options...
Bender Posted January 2, 2012 Share Posted January 2, 2012 How about a picture? How did you apply the india ink? Are you going to wax it to finish it off? I applied two coats of ink with a brush, and other than the interior edges of the fretwork, it was a very speedy process. I'm going to finish it with pure tung oil which is still en route. (So when I say that I love the color, what I mean is that I love the unfinished color and I anticipate loving the finished color). I'll post some pictures once it's finished. Link to comment Share on other sites More sharing options...
Marcus Posted January 4, 2012 Author Share Posted January 4, 2012 Did you use water proof india ink? Which brand was it? I'm going to have to order some so I might as well go with tried an tested! Were you worried about warping of the wood due to the water content of the ink? Did you stain the ends before assembling the instrument? Sorry for all the questions - just new to finishing wood and I REALLY don't want to screw it up! Link to comment Share on other sites More sharing options...
Bender Posted January 6, 2012 Share Posted January 6, 2012 (edited) I have no experience in finishing wood either, so don't expect Yoda-like wisdom, but I'm happy to share what I've learned. I used a brand of India Ink called "Higgins" which I picked up from an arts-and-crafts supply store in the painting and drawing section. I have no idea to what extent it is waterproof, and my understanding is that if I put an adequate finish on it, I will never need to know. In terms of the water raising the grain -- just between you, me, and this publicly searchable Internet forum, I had read about the grain-raising phenomenon but (A.) forgot all about it before applying the ink, and (B.) had no idea it would be so dramatic. In my case it's not a problem, because when I fell in love with the picture of the ebonized Clover on the Concertina Connection website, I was under the impression -- probably mistaken -- that the wood grain on the "production" model was as tactile as it was visual (and on my model, it certainly will be). I despised the soulless plastic feeling of the Rochelle I traded in for it, so perhaps I'm overcorrecting. If I end up hating it, I'll re-finish it. I am performing the finishing step at the recommended point in the instruction manual -- after gluing all the wooden bits to each other, but before starting in on assembling the brass bits. The tung oil arrived yesterday and I applied the first of several coats. Since I am in no hurry, and too cheap to spring for a bottle of non-toxic solvent that I am unlikely to ever need again, I am applying the oil undiluted, which will increase the drying time and reduce the penetration of each coat. I glanced at the pieces this morning, and I think they will look the way I want them to once I've gotten enough coats on there. The cloth I use to apply the oil picked up enough of the ink to become grey, but not enough to change the appearance of the ends, which are still a lovely black, and hopefully now that the first thin coat of oil is laid down, no additional ink will transfer from the ends to the cloth. My only complaint about the tung oil is that working with it makes me hungry, because it smells delicious. Did you use water proof india ink? Which brand was it? I'm going to have to order some so I might as well go with tried an tested! Were you worried about warping of the wood due to the water content of the ink? Did you stain the ends before assembling the instrument? Sorry for all the questions - just new to finishing wood and I REALLY don't want to screw it up! Edited January 6, 2012 by Bender Link to comment Share on other sites More sharing options...
Marcus Posted January 6, 2012 Author Share Posted January 6, 2012 "Yoda-like wisdom"! LOL That's exactly the kind of information I was looking for! It's tempting because the kit is expensive to over think each step of the process and the light hearted way you've approached it is really eye opening! I will endevour to lighten up! I'd love to see a photo of the color you achieved with the ink. Link to comment Share on other sites More sharing options...
Marcus Posted January 6, 2012 Author Share Posted January 6, 2012 One more question! How much ink did you end up using? Link to comment Share on other sites More sharing options...

Recommended Posts
Create an account or sign in to comment
You need to be a member in order to leave a comment
Create an account
Sign up for a new account in our community. It's easy!
Register a new accountSign in
Already have an account? Sign in here.
Sign In Now