

DDF
-
Posts
199 -
Joined
Posts posted by DDF
-
-
11 hours ago, richard said:
Hi Ross
I'm wondering if the inset ends, and the "bone" where the thumbs set on the handles be features of higher level of wheatstone model?
Richard
Mine is a C/G but also has the bone thumb rest and a bone air button and I would say they are some of the best models.
-
I have used a thick shellac mix for valves and it seems to work fine I don't think it would be the best for "pad assembly" or pad attachment.
-
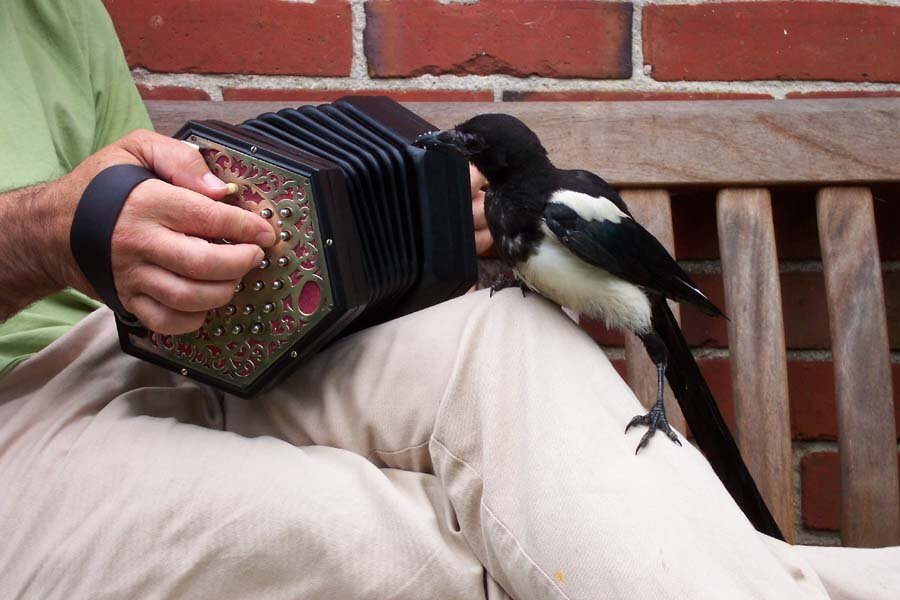
Not sure if this interesting picture has ever been shown here?

-
 1
1
-
-
23 hours ago, Andy Holder said:
Thank you Alex, very informative. Do you know if it's possible to get any? I just looked at your beautiful duets. Are they nickel silver?
In the past I have bought it from here. http://www.metalsmith.co.uk/metals-materials.htm
regards David.
-
 1
1
-
-
2 hours ago, AndyNT said:
Thanks everyone. This thread has inspired me to get to grips with box stitching and make a concertina case in a more traditional-style. Another project for the darker months
")
Has anyone tried lining with a thin, soft leather such as goatskin or pigskin rather than cardboard?
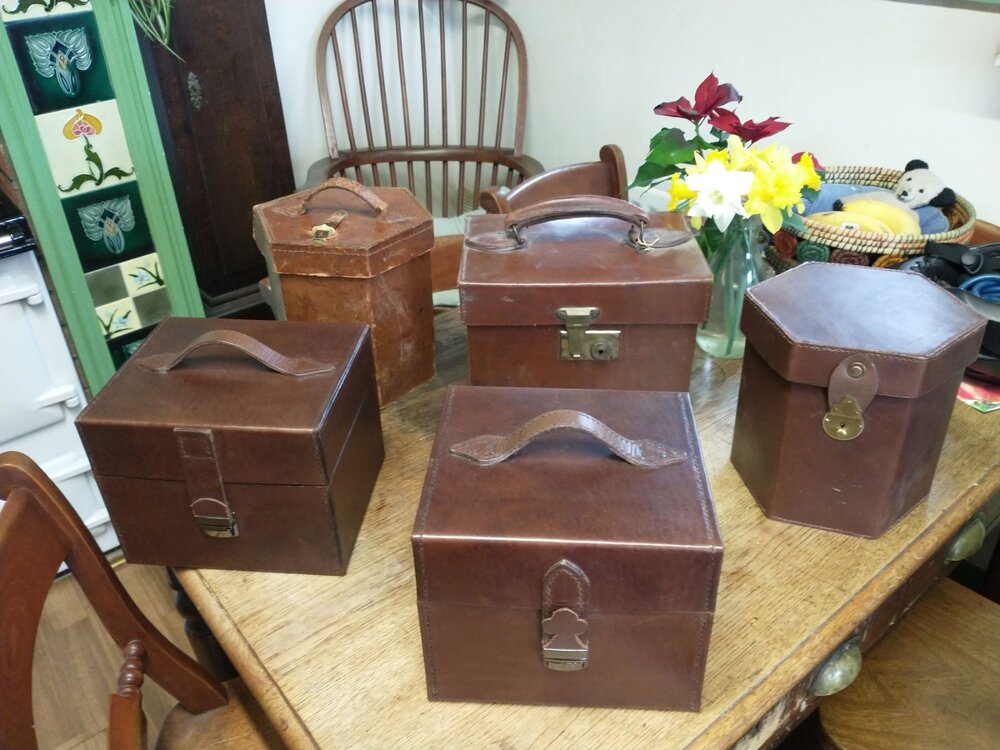
Its definitely worth having a go. That case in the left hand back I made in 1980 with no knowledge and very few tools.I made it from small leather suit case which belonged to my grandmother.It was bought for her when she left home as a young teenager in the 1920s,to work in service as a maid. I have used it almost daily but rather than patch it up decided it was time to replace it hence the new cases last winter.To be completely candid I made two because the first one turned out 3mm to small.
You can line the case with whatever you like .The cardboard as Adrian said when laminated with hide glue makes a really stiff board to make the case. The soft lining is to protect the instrument from abrasion when pulled in and out over and over. regards David.
-
1
-
-
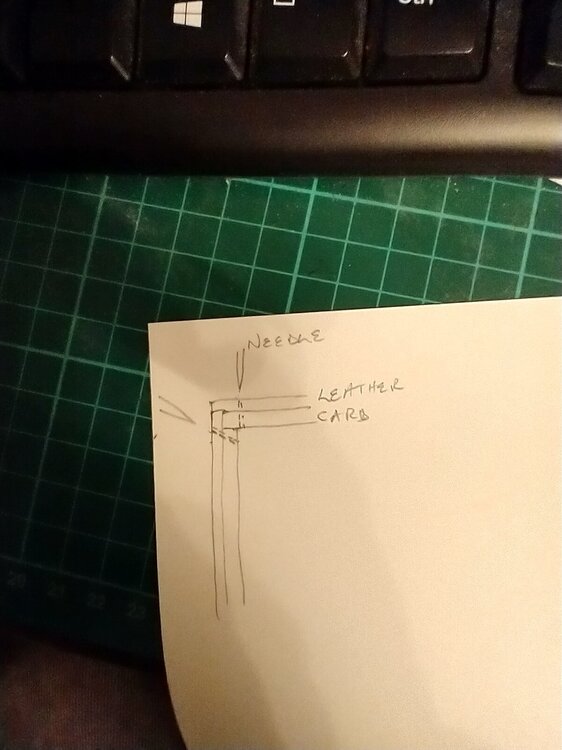
Hello Adrian, I think Alex's beautiful case is a wooden box with a leather covering whereas in the "traditional" type, the leather and card form the structure of the case. I have a lachenal square case where the stitching is so close to the edge that it goes through the corner edge at about 45°. I also have a Crabb square case which seems to be constructed more along the lines of technique I used. I had thought the square cases would be easier to make than the "jug" style but they not really. I should also say if anyone is worried about my handle position on the square cases and them accidentally falling open and spilling the contents rest assured I have tested that scenario. The concertina stays in the case.
-
If you do go for the wood lining you may need to drill the stitching holes as the stitching punch will likely damage the wood edges too much,just a thought.
-
These are a few I have made myself over the years the front two last winter. They have card lamination inside and are box stitched . I found a little superglue and activator works well to hold sections together whilst stitching.

-
4
-
1
-
-
As it has raised amboyna ends I wonder if the buttons were gold plate on brass and are now bare brass?
-
Just looked at another of his videos and the thumbnail to it show where I imagine the noise is coming from. The buttons are un-bushed and look quite slack in the end board.
-
4 hours ago, papawemba said:
Hello, I asked myself the same thing...
Look at this video : https://www.youtube.com/watch?v=HpCBdONhtjk
You can hear the clicking sound...Not idea if this is a good or bad concertina, but the result is amazing 😉
That one does sound like buttons without bushings.
-
Tricky to say without at the least links to the videos.Could be a fantastic instrument which has pads that have gone a bit hard could be a not so good instrument with no bushings in and around the buttons?
-
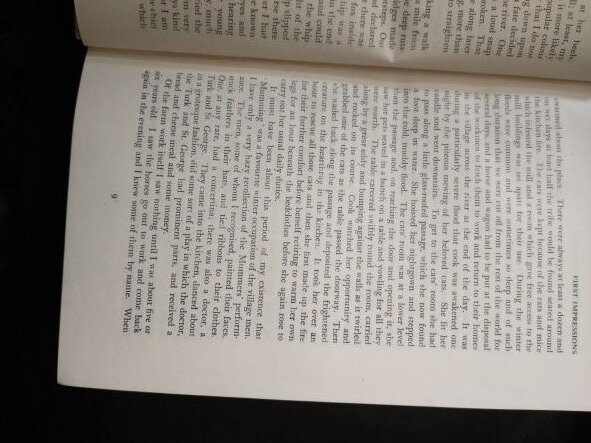
The second is "Tripping up the stairs" i think?
-
This is from "i was born in the country" by H S Joyce 1946.
-
I have never found the dye in meths an issue with darker woods such as mahogany and rosewood etc but if the wood is pale, satinwood,birch etc I would use de waxed bleached shellac with clear alcohol. If anyone is interested the mixture we used to use to revive dirty tired french polish was equal parts linseed oil, meths and vinegar. shaken up to emulsify and rubbed on to the old polish with clean lint free cloths or a rubber then buffed of to remove the dirt and oil.
-
2
-
-
On 2/4/2023 at 6:36 PM, alex_holden said:
I tend to get very inconsistent results when I try to polish up to final gloss by just rubbing with a pad. Sometimes the process seems to be going OK, then I rub all the way through the finish in one spot (typically on a sharp corner), or the pad sticks to the surface and leaves a rough patch.
The process I have recently been using with a reasonable amount of success is:
- Sand the bare wood to a high grit (at least 800).
- Pore fill. There are different ways to do this depending on the colour of the wood and how deep the pores are. If the pores are quite shallow I sometimes just put a few thick coats of shellac on, let it harden, sand back to the wood, and repeat until the pores are all full of shellac. This takes a while but may look more attractive than filling them with some kind of opaque paste. For woods with deep pores I've tried a bunch of different things with mixed success.
- Build up a reasonable thickness of shellac by wiping on a lot of coats (I'm using a 2lb cut IIRC) and letting it dry between coats. This will probably take several sessions over a few days. Try not to get carried away and put too many coats on in a session or the finish can get tacky and take a long time to harden up. It's important not to let any significant dirt or fibres build up in the finish because they will become more visible when you polish the surface later. I try to keep the pad and the work area as clean as possible, and if I find any dirt that got trapped in the finish from the previous session I sand it out before putting a new coat over it. The worst sort of contamination I've had was fine metal dust, e.g. brass filings, because it shows in the finish like glitter and it's really hard to get rid of it all.
- Let it harden for a while (at least overnight, a week would probably be better). I test the hardness of the finish by pressing a fingernail lightly on an inconspicuous spot. If it doesn't leave a dent it's hard enough to polish.
- Sand it smooth in several stages up to 1500 grit. (If you accidentally sand through to the wood anywhere, go back a couple of steps and build up more layers of finish.)
- Polish to a gloss using Super Nicko polish.
I've stopped using any oil because it didn't seem to do anything useful for me, and the final finish seemed softer if there was oil in it.
Another way of finishing is once you've built your layers and let them cure/harden is to then do the final gloss finish.This can be done by using the same" rubber" but only charging it with meths/alcohol, this thins the shellac remaining in the rubber until you are almost removing a little of the finished surface . You'll get a very gloss finish but it it is very easy for things to go awry so a lot of care is needed.
-
1
-
On a walk near my home in Dorset uk
-
6 hours ago, Jody Kruskal said:
A word or two of explanation: I saw the picture of the concertina springs image years ago. It was published here on C.net. I thought it interesting and downloaded it to my photo library where it sat by it self, all alone. for a long time.
I sometimes thought about that spring photo, but could not find a context for this mysterious graphic.
Then I started to put two and two together and came up with this idea of two unrelated images where the viewer could bounce between them to make a sum greater than the two on their own.
So, many thanks for indulging me. Please do add to the concept with concertina images of your own that mangle relationships and comment on each other in interesting ways.
But more important, keep squeezing!
Ah, I remember those pesky springs in a Jeffries i bought.Here's a contribution.
.thumb.jpg.d0322d79801a8946a68d41d5287babef.jpg)
.thumb.jpg.fa2b020f1569c44b659d15dece532e85.jpg)
-
Looks like damp air is making the inside of the cover expand at a greater rate than the outside which is probably film coated.
-
1
-
-
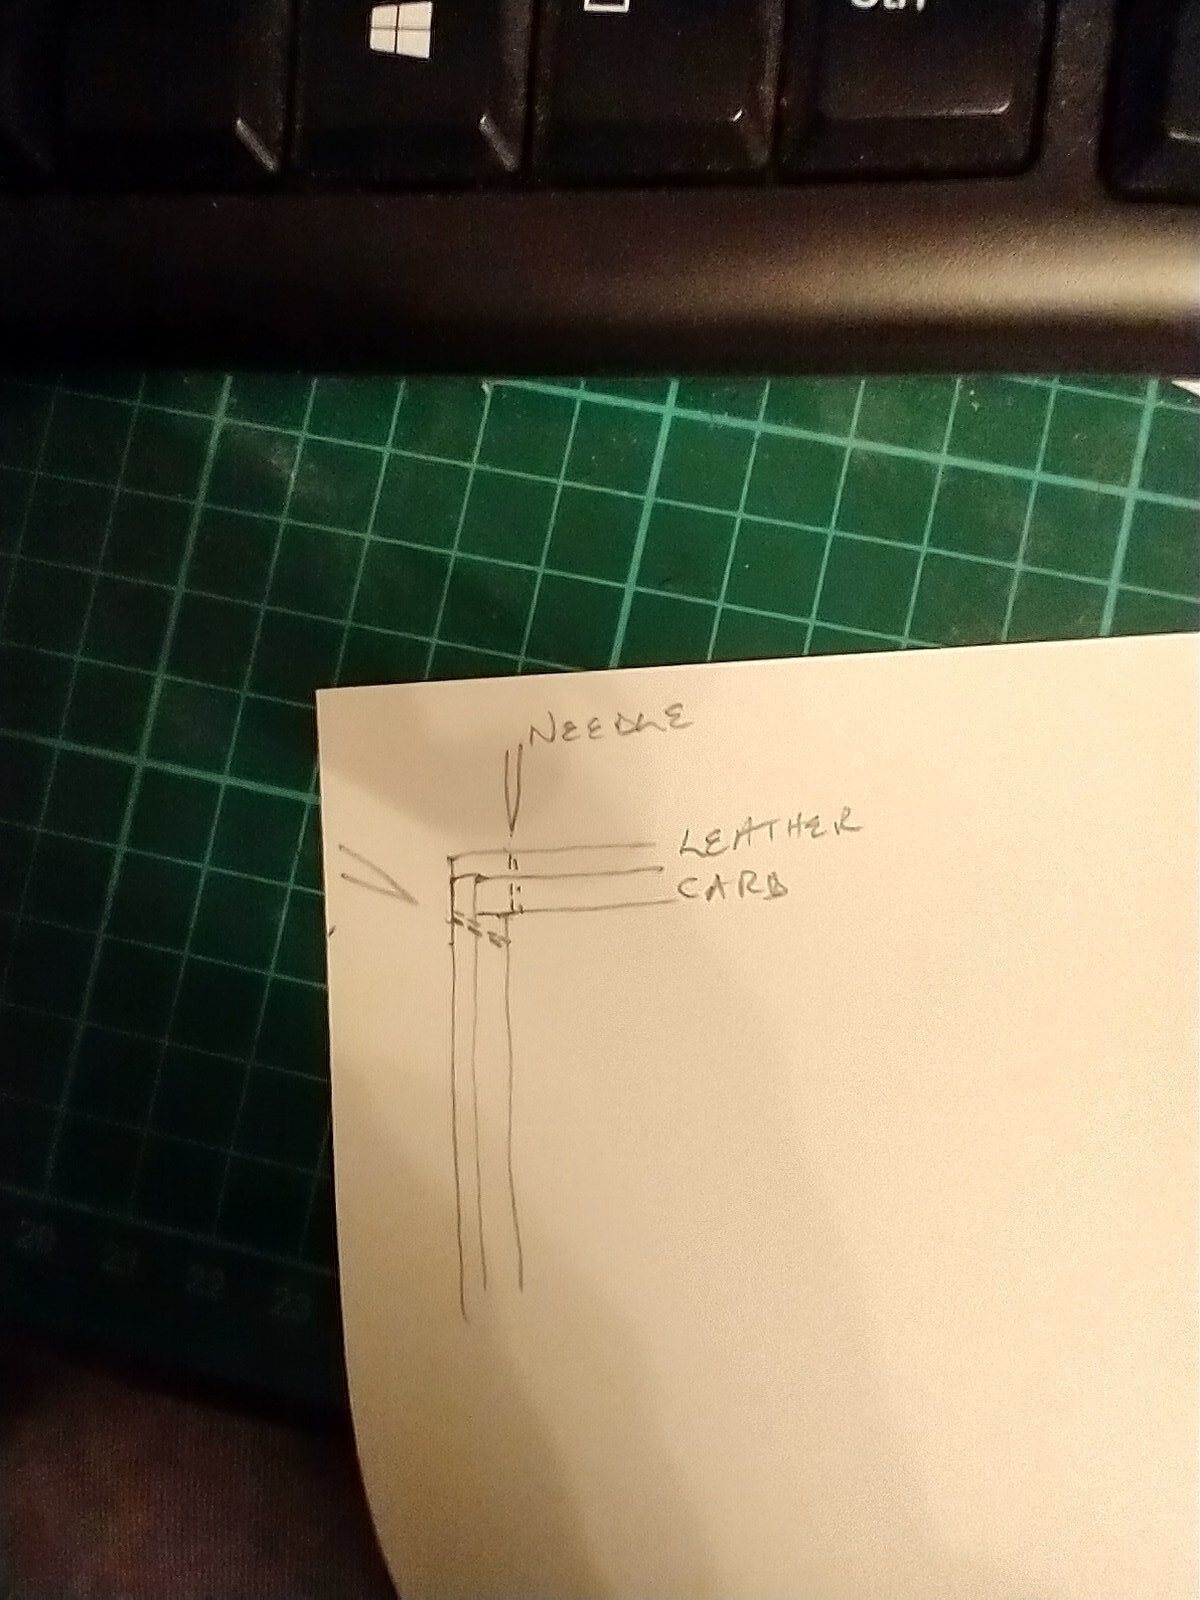
I didn't measure the thickness under the clamps this would be the place to find the original thickness.I would guess they started with two or maybe three gauges of steel before working the tongues .In the Wheatstone workshop film it shows them surface grinding the uncut tongues so I guess they would have have a gauge near to finished size before profiling. The final filing goes right up to the clamps which probably explains the variation in the measurements at Point"1". Regards David.
-
1
-
-
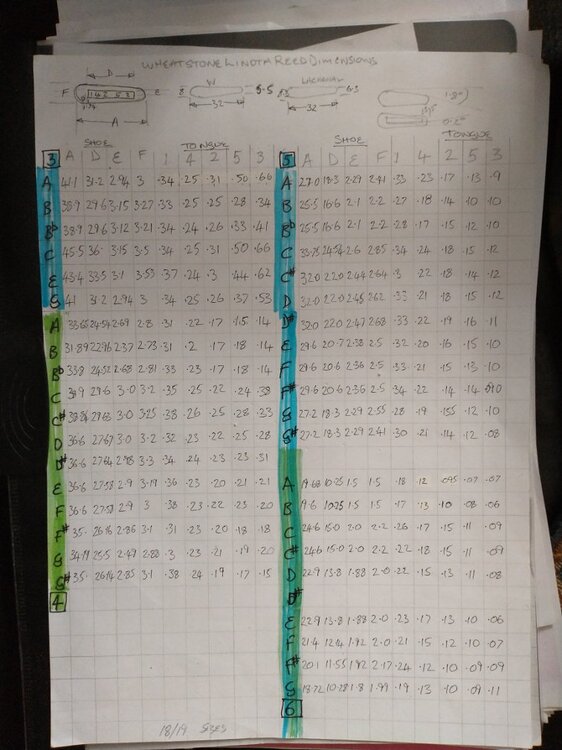
On 8/13/2022 at 3:41 PM, David Lay said:
It seems concertina designers either learn their craft be working with someone who knows (a Master) or by research and experimentation. (Wouldn't a design manual be nice!) I would like to better understand reed design. For any reed tone, there are several aspects that can be adjusted including reed length, width, initial thickness, metallurgy, and lastly - filed variations in thickness. Assume one has the frame gap and potential air leaks all resolved. What reed dimensions would one start with for a very responsive C in each octave? (C3, C4, C5, C6). I expect a larger but thicker reed may be capable of sounding at a desired high pitch, but that it would be "stubborn" to start and muted. Could one make a "stubborn" reed more responsive by filing?
This may or may not be of interest.These are metric measurements from the reeds in my 1917 Wheatstone Linota.
-
1
-
-
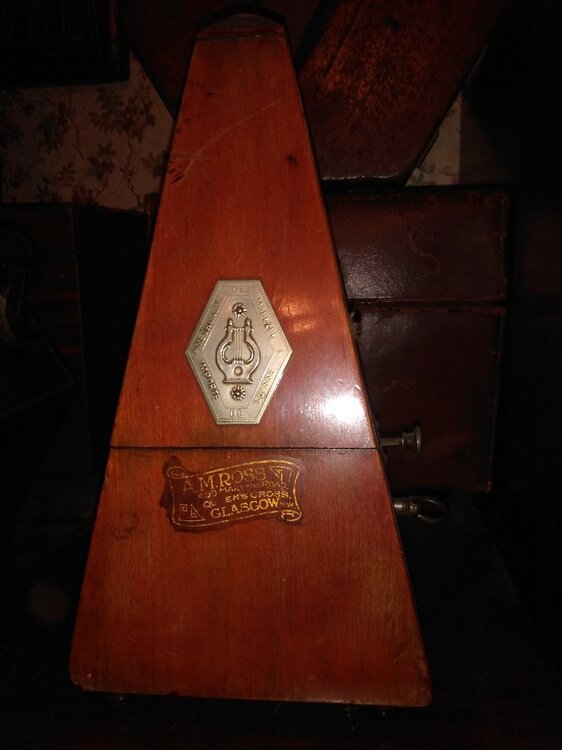
Snap, Many years ago some friends were coming to visit and picked this up in a charity shop en route. They thought it would be a bit of fun. It is in much worse condition than yours but as mine was was double reeded I hung on to it and it has been "a bit of fun". Regards David.

-
Ross also sold metronomes.
-
"German silver"/ nickel silver.


.jpg.54088b0a175059aa28793131f6599a92.jpg)
.jpg.46f399d599e14fc10303e00eb955ca9f.jpg)


Wheatstone G/D concertina
in Buy & Sell
Posted
Hello Ross, Just a thought which I'm sure Greg or yourself will already be aware of? I had owned mine for decades and had it apart numerous times also it had been in to Andrew Norman for new bellows and light touch tuning. The previous owner had it lightly re fettled by Colin Dipper. Nobody ever could put a serial number to it though. A few years after receiving it back from Andrew I had a spring break.When I split the action enclosure to replace it I noticed (beneath a strongish light) a serial number, difficult to spot but just about readable. I have enclosed an image of the left hand(bass) end showing the impressed number. Might be worth a check on yours with a bright light or a uv lamp?Regards David.