Dana Johnson
-
Posts
831 -
Joined
-
Last visited
Everything posted by Dana Johnson
-
What are metal ends made of?
Dana Johnson replied to Andy Holder's topic in Instrument Construction & Repair
I was lucky to be able to buy my NS C735 with only a 50 lb. minimum, though I am near the end of my second 50# coil. I was able to get it rolled to the exact width and temper ( 1/2 hard ) I wanted. I made my wife’s 25 years ago and it is still bright as the day it was made. NS comes in a number of different alloys which vary in properties as well as color. The C735 is used primarily for things that require a silver appearance like ornamental belt buckles, jewelry etc. people with corrosive sweat will dull and erode it if not wiped down regularly. Some environments also dull it after a few years. Nickel is no remedy for corrosive environments. My sweat ate through the nickel plate on my old bastari exposing the brass underneath which then got eroded as well. Chrome is very resistant, but unpleasantly cold in color to my tastes. A jewelry polishing cloth used occasionally will keep up the shine, but more aggressive polishing is required for badly dulled ends. Plating also has a nasty habit of flaking away especially where it has worn through. I had one set of ends nickel plated many years ago, with the NS alloy I was using, you couldn’t tell the difference do I didn’t do any more. Stainless is easy to get laser cut, while copper alloys like NS may require something other than s CO2 laser since it doesn’t couple well with infrared wavelengths and requires much higher power. Stainless can be a bit cold too though. -
Nothing special about round ends. It is important to cut the valves with the direction of least stretch as the long direction of the valve though.

-
Reed slot stepped profile
Dana Johnson replied to 4to5to6's topic in Instrument Construction & Repair
Marcus had reeds made similarly but with the back relief cut with a circular cutter like a woodruff key cutter. He was trying to mimic the tapered windows on concertina reeds in his hybrid instruments. Wheatstone mostly created the taper as part of the punching process in relatively soft brass, finishing the window sizing with small broaches. I experimented with different methods to reduce the volume of a low drone reed, first by making a verynarrow reed, then changing the relief angle, and finally using an end mill to reduce the thickness at the window similarly to the reed in the image to about .020 inches. This was the only way that produced a very noticeable reduction in volume. What seems to happen is that reducing the thickness limits the distance the air flow can add power to the reed. I once made a few reed sets with bell mouth shaped windows similar to an old Jeffries I had. This had the effect of changing the pressure / volume curve so that small increases in pressure had greater effect on the volume. I used curved scrapers to creat the belling which was actually quicker than filing. These reeds worked very well, but I stopped doing it because I wanted more control on the dynamics. One thing to keep in mind is how different parts of the reeds scale. A long reed in a window of a given thickness swings through a shallow angle before it exits the back of the window. A short reed in the same thickness has to swing farther to exit the window. One way to attempt to equalize this across the reed lengths is to vary the vent angle, from nearly zero at the low end to much greater for the high end. Very low reeds may need thicker shoes to get good volume. I have a set of bass accordion reeds that have windows in cast plates that are about .375 inches deep at the tip end of the reed. ( the plates are tapered so they are thinner at the root to save weight I expect ). The other way you can do this is to use the same angle throughout but change the reed stiffness so shorter reeds bend more easily at the same playing pressure. Practically speaking, some attention to this issue is necessary to get sufficient volume of the mid to higher reeds without having to use more bellows force. Getting this right produces very noticeable effects. I found that regarding vent angles, each reed length has an optimum vent angle above which the reed loses its maximum volume and below which volume at a given pressure drops off. This also holds for making reeds thinner which will respond at lower pressures, but max out at lower pressures as well. With my reeds, I change the vent angle in steps about every octave and that has made for very even response across the range. ‘Reeds made by someone else would need their own set of angles. There is no one right angle, especially since choices in reed profiling directly affects the issue. The milled out reeds in question are in my opinion, a quick and dirty attempt to deal with this issue. That seems in keeping with the later cost cutting attempts at the Wheatstone co. -
questions about making tongues
Dana Johnson replied to lucayala's topic in Instrument Construction & Repair
Tom, my maximum is .0015 inches/side, but minimum is .001”. I can do tighter, but the high harmonics go up too much and the centering accuracy needed for pitch stability becomes substantially harder since an error of .0001” is a much larger percentage of a very small gap. Very small gaps increase the chance of a reed buzzing or impinging on the frame. This will affect single reed shoes with narrow window sides more than a plate with wider metal at the perimeter, and affects longer reeds more compared to short ones. Smaller clearances can increase responsiveness, but I find there is a limit to their utility. Tight clearances also require progressively more careful and difficult fitting with decreasing benefit. On the other side, wide gaps rapidly decreases reed responsiveness and makes for poor reeds. The ideal is to find the clearance that produces your best playability and tone results and to try to reproduce that to very small tolerance, say +/- .0001” or .0025mm ( then center it as perfectly as you can ) I recently made 16 new tongues to match badly rusted Wheatstone reeds in the 5th and 6th octave range, and did those to .0007”/side but these were small to tiny reeds, so the small gap was more proportional to their length. Dana -
Cleaning up Nickel Siler ends
Dana Johnson replied to Marcus's topic in Instrument Construction & Repair
Already spoke with Marcus, for reference. The ends are C735 NS which is 18% nickel. I have it rolled to my specs 1/4 hard for better bending resistance. I tried bright overplating with nickel, but unless it is very thick, it wears off and is not more resistant to erosion from the corrosive sweat of certain people. This alloy is what is used for things like belt buckles of the sort you find in New Mexico next to turquoise. The alloy I have seen in Jeffries and Wheatstone is a slightly yellowish alloy in comparison. You can see the difference where any plating has worn off. There is no visible difference in color between bright nickel and the C735 I use “sunshine cloth “ to remove tarnish, though the sort of polishing cloth you can get at a jewelers for gold and silver works as well. Marcus’s instrument has been with other owners for many years, and while it had some spots where hand or finger contact had dulled the polish, overall, it was still untarnished. Something changed in Bermuda which isn’t surprising considering the sea environment. Chris Ghent mentioned to me something about NS turning a bit yellow in a freshly glued case. That isn’t the case here, but it does show the alloy has a vulnerability to certain atmospheres. if you are trying to remove scratches or pitting, abrasive paper finishing with 1500 grit , then polishing with an appropriate compound works, but on a plated end you’ll cut through the plating that way and it is better left alone. The best way to keep an instrument looking good is to wipe it down with a lint free cloth dhen you are done playing. My wife’s concertina is 22 years old and looks pristine. Btw, I have about a half of a roll of the C735 alloy left from my second 50 pound roll which I probably won’t use up. It is 6 inches wide X .025” thick which is what I needed for my pressed ends. I haven’t weighed it, but probably about 25 lbs left. It is s large diameter roll and unrolls fairly flat. Dana -
Flap valves for concertinas need to operate at very low pressures compared to their use in organs. While the playing pressure may go up to perhaps 4 inches of water column, the valves need to open at much lower pressure in order to play softly and not obstruct the air flow.. This means they should be as flexible as possible, yet still have enough spring to return to flat once the pressure ceases. Dense leather needs to be quite thin to lift at low pressure, but it’s weight at those thicknesses make it vulnerable to sagging away from the reed pan. If they are thick enough to resist this, they don’t lift easily enough and dull the sound. Leather that is less dense can be thicker and gain spring by having the surfaces farther away from the center of bending. Heavy hides like cow are very dense at the hair side, and if split thin enough lose most of the less dense flesh side. The optimum comes when the leather comes from smaller animals whose skins are much thinner to start with and include the least dense portion with the hair side being a smaller proportion of the thickness. Low density valves require less spring force to close or keep from sagging even when they are thicker. A lot of older instrument’s valves were alum tanned or tawed hair sheep , a naturally white leather with a tight outer grain from the alum which gives good spring without adding weight. Unfortunately, it also creates a slightly corrosive environment which can turn brass reed shoes dark where they have a valve next to them. Alum tanned leather still has dome alum in it and will rot if the alum is completely washed out. Finding leather that mimics alum tanned is a good goal, and the Columbia CPL at least works pretty well, while other leathers they have aren’t as good. The aolian Morton CML maroon version of the CPL is treated with heat to help seal the grain side, and it can work well, but they don’t have it any thicker than their CPL which is my only complaint for either. Welling and drying flat still may need to be done if it comes too soft. Dana
-
Just for reference, the extra heavy CPL from Columbia is heavy only in the context of organ pneumatics. It is too thin for valves for notes below midrange. Their “valve” leather is substantially heavier. But the valves in question are organ valves. I wish they would carry their CPL in “ultra heavy “ around .028-.032” their skins are not that even in thickness and the top number they list for each weight may only be reached on dome pieces. I always thouroughly wet it and dry it on glass because it Is tumbled softer than good flap valves should be. Dana
-
Quality Difference in Concertina Play
Dana Johnson replied to David Lay's topic in General Concertina Discussion
Concertinas with limited range can get by with one pad hole size, but it isn’t ideal. Large low reeds need larger hole sizes or they will starve their reeds at higher volume. Small reeds behave better and sound clearer with smaller holes. Concertinas with a large range of notes really need to have a gradation from low to high, though this can be in 3 or more steps. I set my pad hole sizes by using the smallest hole that didn’t starve the reeds ( causes a fairly sharp tonal change where higher overtones drop out ) a baritone’s low notes use a lot of air and need large enough pad holes to allow them. To have the reed be the limiting factor on air, not the hole. You might think the hole has more area than the reed gap, or even the open reed, but the effect is there never the less. We may need to think of the pad’s air space being the ring of gap around the pad as it lifts. The effect is similar to a pad not lifting high enough. My set of Wheatstone baritone reed pans have larger reeds than the same pitches in a treble or tenor treble. The low reeds overpower reeds not designed to match them. By all means, start by copying. A great deal of trial and error has already been done a hundred years ago by very clever people. Dana -
Replacing springs.. what is the secret?
Dana Johnson replied to seanc's topic in Instrument Construction & Repair
Whatever you use, make your coil size a little larger in diameter to the old originals. That alone will dramatically increase the spring lifespan. At a certain point, fatigue drops to near zero. My springs are still fine after 4 million cycles, up from 10,000 of the same wire at the coil size of trad concertina springs. While music wire steel can make fine springs, it does rust compared to that ruthless SS. I like to keep carbon steel out of concertinas, since the wood it touches absorbs moisture from the air and is never truly “dry”. Often the steel screws that attach hand rests on old instruments and the like are badly rusted. Brass screws poor shear strength still leave steel as better if not great because you generally can still unscrew them. -
The old reeds were brass, but C510 Spring temper Phosphor bronze works fine and may have a longer lifespan since it is designed for springs. It’s physical properties for reed making are very similar to “common” brass and won’t need work hardening since it is already rolled to the optimum temper.
-
Push Reeds Sink with High Pressures
Dana Johnson replied to Dissonance's topic in Instrument Construction & Repair
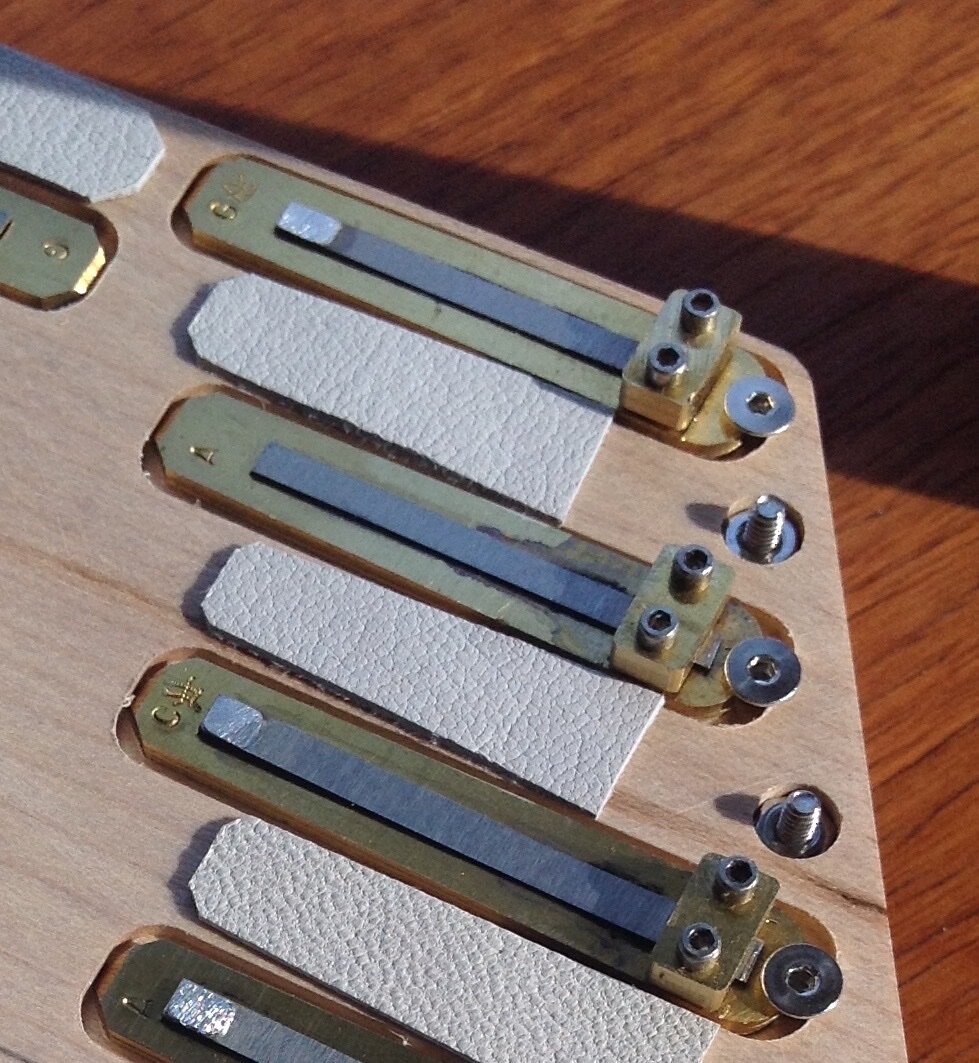
A couple other possibilities are hardened valves that don’t lift enough, also pads that don’t lift high enough, which will pull the pitch down when they won’t allow enough air to pass, especially if the concertina has smaller pad holes. Also as mentioned in another thread, the pins that keep the valves from lifting to far can be set too close to the reed, which causes the same issue as pads that don’t lift enough, and affects the press reed valves which are the only ones with pins, (except for large valves on low pitched instruments which can have a wire or other device to keep the bellows side valves from flopping away from the reed pan. -
It is very likely playing too long at a time in the beginning is the cause of your trouble, though things like carpal tunnel syndrome can be the result. Right now back way off on your practice and stop if it is hurting at all. Different things happen to your body when playing. First, muscles get used in ways they aren’t used to, you don’t need a death grip to have a thumb muscle tensed for hours on end. Also, depending on how you play, one arm may hold its end still while the other moves the bellows. This means one shoulder area is getting isometric exercise while the other alternately moves and relaxes. Nerves can be pinched in the shoulder area from muscular pressure that can be felt in the thumb or wrist or other fingers basically any joint on the way from your neck to your hands can impact your nerves. Slowly building up playing time gives your body time to balance things out. Carpal tunnel syndrome is one of a number of repetitive stress injuries. To avoid it, the tendons that operate your fingers need to pass as close to straight through the carpal tunnel which is like a band around your wrist. Arching your hand back or in the direction of your thumb causes them to press on the band as they move around a corner back and forth when playing, eventually causing irritation and swelling. Holding the concertina too close to your body causes you to angle your hand thumb-wise as well as bending your hand back. Ideally, your elbow should be at an angle greater than 90 degrees which happens when you move the concertina towards your knee. Your arm should make a straight line from elbow to the tip of your middle finger. The closer you get to this, the happier your hand will be. Depending on your concertina’s shape, this may mean rocking it up a little on the corner rather than flat on your thigh/knee. The last thing is to learn to relax your muscles every instant they aren’t being used. like when you stop a note or change directions. If you do this, you’ll find you get much less tired and reduce the pain from maintaining muscle tension. On a duet, try changing direction for phrasing rather than from reaching the bellows limits. Dana
-
Raising reed pitch by traditional or other methods
Dana Johnson replied to wunks's topic in Instrument Construction & Repair
The stiffness of an alloy is defined by its modulus of elasticity, sometimes referred to as Young’s modulus which measures the amount of strain produced by a given stress, where strain is a measure of elongation under stress. This is not the same as tensile strength or yield point which refer to the amount of stress needed to produce permanent change. While tensile strength and yield point increase with increasing hardening of an alloy either by heat treatment in carbon steel or work hardening in brass or other nonferrous alloys, only one number is listed for the alloy’s modulus of elasticity. I once tried hardening a reed of 1095 steel to a temper starting at file hard, where a file would not touch it, and gradually lowering the temper to light blue where it was quite soft, but not really annealed. This didn’t change the pitch (which depends on stiffness) but had a large effect on how easily the reed was to permanently bend or change the set. A long time ago I switched from 1095 steel to the Uddeholm UHB-20C alloy which has as one of its listed uses as accordion reeds and is produced in a somewhat harder temper than the blue tempered 1095 steel. This alloy seems slightly stiffer, and I found that a given profile will have a higher pitch. It also shears cleaner and holds its set better which I like a lot. We normally equate stiffness with hardness but I think that is because most of the stiff things we encounter are also hard. Brass of any hardness is less stiff than any steel. I have a hard time letting go of this myself but if you want to calculate the frequency or amplitude of a reed, the number you use is the modulus of elasticity. If you want to calculate the amount the reed has to bend before it won’t return to its original position, you use the tensile strength yield point. Dave’s remarks about detempering a reed with hot solder are still an issue, though since it only is used at the reed tip where the steel is at its greatest movement but least bending, done properly, it doesn’t influence the part of the reed where it would cause real bending trouble. Regardless, doing no damage to a reed is the goal. especially on old and valuable instruments. You need to avoid heating the reed except where the solder touches it and removing the iron as soon as you see the solder wet the steel. The flux works at the low end of the temperature, and the melting of the solder helps absorb the excess heat that might overheat the steel. I use a Kester brand low temperature silver bearing lead free solder that melts at about 215 degrees C, with a synthetic rosin core (removable with alcohol and non-corrosive residue ) that leaves the underside of the tip at a light straw. It wets the steel very well and stays bright for many years. Please pardon my inability to keep things brief. For me, this is talking shop, so I get carried away. Best wishes to all, Dana -
Raising reed pitch by traditional or other methods
Dana Johnson replied to wunks's topic in Instrument Construction & Repair
There are a few things to know. Actions on the reed Removing/adding metal are not uniform on the reed. Adding weight at the tip where actual bending is least lowers pitch. This effect continues down the length of the reed though to an ever lessening degree. If we are not talking about solder or other soft metals, then the extra metal starts to increase the reed’s stiffness countering the lowering effect. ( soft metal just damps vibration when it is bent) Removing metal at the tip causes the pitch to rise, an effect that continues down the reed to a lessening degree until the reduction of mass is countered by the reduction in stiffness which has the opposite effect. Likewise , removing metal at the root where bending force is greatest decreases stiffness, lowering pitch. Again this continues to a lessening degree up the reed until it is countered by reduction of MOVING mass. As you can see, there is a stretch roughly around the center of the reed that some refer to as the belly that has little effect on pitch, but does effect the stiffness of the reed. Thinning a perfectly good reed in that area just weakens the reed, reducing its maximum volume and increasing the tendency to choke or blow flat under pressure. For practical purposes, removing metal for tuning purposes should be restricted to about the first and last quarter of the reed’s length. This wants to be spread over that distance to avoid spots that will focus the bending. When designing reeds, the profile ( longitudinal cross section ) needs to produce a reed that is similar in stiffness to its mates. Lower reeds need to be about 70% of the stiffness of the mid range reeds, while higher pitches need to be only 40% or less of the stiffness of the mid range reeds. This is because all the reeds need to speak at very close to the same bellows pressure, but the aspect ratio length/ width and total area of the reeds varies dramatically as well as does the perceived loudness of the different pitches. This variation of stiffness should be a smooth transition from one reed to the next, with each reed falling someplace on the overall curve depending on its pitch. To accomplish this, you adjust the profile so that for a given reed length, the tip is as thin as it can be but still thick enough to keep the overall bending smooth and strong enough not to be vulnerable to damage. The tip has to have enough mass to lower the pitch while the reed still is acceptably stiff. This creates low reeds that are thicker with higher mass at the tip, reducing thickness toward the root to keep the stiffness low enough to reach the lower pitch. High reeds are the opposite being thick at the root and thin at the tip. The mid range reeds are close to flat, but not quite. Flat reeds can work, but they restrict the length parameter in a way that makes low or high reeds Impractically long or short, as well as making it very hard to get a good balance in volume. When designing reed profiles, the “central” section where the pitch raising and lowering effects of metal removal cross, is where you can adjust the reed stiffness without affecting pitch, though as the neutral area is thinned, the neutral center moves toward the tip since stiffness is reduced much faster than the mass is reduced. For a given loss of metal. Generally reeds are never a straight taper either direction and are at least slightly thinner than a straight line would make them in order to keep the stiffness in a practical range. These are the basic principles for reed design to create responsive well balanced reed sets. Individual reed makers will make their own choices that work best in their instruments. There is still a fair amount of latitude here since the stiffness vs mass distribution can produce reeds of a given pitch and length within a range of profiles. I know this is a lot of info and goes well beyond your question, but a number of people from time to time want to adjust their reeds and a good understanding of what is happening can help avoid mistakes. Making reeds by hand is a very practical thing, not some arcane knowledge. I measured my reed stiffnesses with a clever gadget of my own making, but when comparing one reed to another like it, springing them with your fingers will tell you whether one is even slightly stiffer than the other. You can make replacement reeds for yourself if you are careful with a file and ready to make a few bad ones at first. I do most of my reeds on my CNC grinder, but there are a few I make by hand in the lowest notes like G2 and A2 since I use so few of them. Dana -
Whatever you do, make sure it (and you ) can survive a spill. I’m not a big fan of soft cases. I know a lot of people use them. They are fine until they aren’t…
-
Bellows pressure and musical pitch
Dana Johnson replied to ttonon's topic in Instrument Construction & Repair
Hi Tom, I am not sure what different air oscillation modes a chamber can provide, and I am pretty sure hemholtz resonator is one, like the main body resonance of a violin box, as well as a back and forth sloshing mode where the the pressure alternates ends of the box without air entering or leaving the “f” holes. There is also the question of how the reed itself alters the hemholtz frequency. Calculations for ideal resonators must have to be modified when for instance, the chamber has flexible walls ( lowering the frequency. ) Your experience of the reed being killed when the resonator matches the fundamental (or any strong harmonic ) is what I expected. You are right about being able to alter a balky reed’s chamber to get it going properly. On My Wheatstone Layout G/D there is a pad that opens onto a chamber with 2 reeds that are of substantially dissimilar lengths. I found the small one of the reed pair was much quieter than it should have been compared to reeds of similar pitch in other chambers. I split the chamber into 2 sections and the reed immediately was at its proper response and volume. Note that the drastic change in chamber volume had no noticeable effect on the either reed’s tone compared with other reeds at those pitches with full width chambers. ( the reed in the short side is a press reed so is not visible. The split chamber allowed me to dispense with the valve for this small reed where without the partition, it needed one. This idea of resonances interfering with the reed vibration is something I have generalized, with absolutely no proof, to the notion that the body of the concertina behaves like a filter, suppressing or reducing the various components of the reed’s spectrum. Hopefully you will be able to get as close as possible to an isolated reed without the complications of chamber volume. You might need a good anechoic ? chamber to do your tests in because normal rooms can have a surprising number of resonances that can cause trouble. If you need other reeds, I’ll be glad to help if I can. Best Wishes, Dana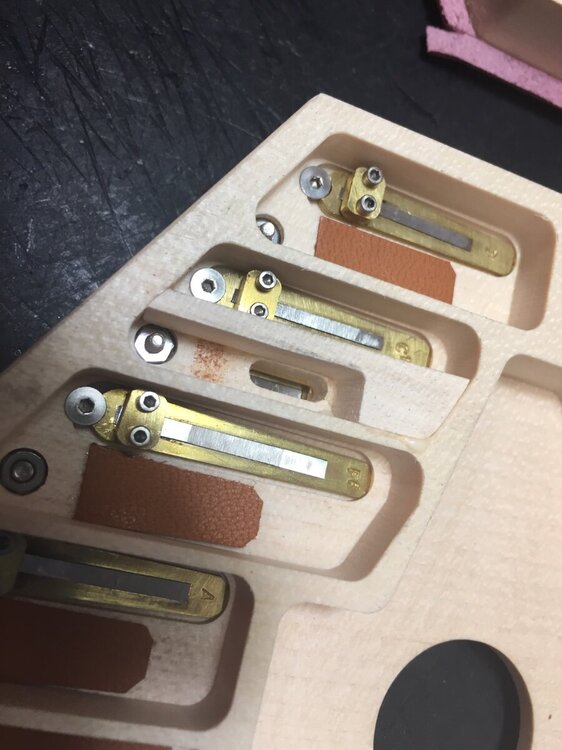
-
How to smooth the apex of the bellows?
Dana Johnson replied to genepinefield's topic in Instrument Construction & Repair
I make Wheatstone style bellows where the binding goes on last, I skive my runs down to zero at the edges over about 6 mm of width. With the binding being 18mm total. Coupled with the opposite shive on the edges of the leather butterflies, (leather, not papers ) this leaves a pretty level surface. Where the skived surfaces overlap. For the rounded corners, I cut the ends of the pleats on a shallow angle leaving a v shaped notch at each peak end. The angles are such that combined, they form a segmented arc. The split at the ends comes together when I put the gussets on and fold a little skived excess over the top. Once the gussets are on, the bellows is air tight, and the binding only serves as protection and a cover for the card edge which I also cut with s 45 degree mat cutter so the card thickness at the peak is zero, helping to reduce the need for the leather to stretch when the bellows is closed. The wider your binding strips, the more material on the side you have to try to smooth out, so don’t think wider is better. When I wrap my binding, I use a bit of wet sponge to wet the binding a bit where it goes around the corner. That lets that portion of the leather stretch there only while allowing you to put more tension on the strip ahead of the corner. This helps since your strips cut parallel to the spine are goat’s least stretchy direction (belly skin excepted) , leaving its natural stretch across the peaks where it helps to reduce the bellows stiffness. The wet at the corners allows just that part to stretch, pulling down the edges at the corners nicely with little or nothing to smooth out. Dana -
Bellows pressure and musical pitch
Dana Johnson replied to ttonon's topic in Instrument Construction & Repair
Tom, I don’t consider a reed that fails to speak due to chamber length mismatch, “choking”, what I experience as choking comes from a reed that speaks fine at lower pressure, but stops abruptly if the pressure passes a certain point. I experience this in two cases. First is when the reed is set too low, which may decrease the starting pressure ( seemingly a good thing but limits you to quiet playing ). Second is when the reed is weak for its length ( incorrectly profiled in the neutral area ). These reeds will choke regardless of set. I wonder about the hemholtz resonator analogy. I am not sure how this works since the chamber is open at both ends, though one end changes as the reed moves. Is resonance the only characteristic a chamber can have? Also, in the G1 chart, the bold numbers are for the 15th harmonic which is going to be vanishingly small, and I have a hard time seeing that as killing the vibration. I wonder if electrical analogies like capacitors and inductors might be in play, since both the reed and chamber can be energy storage /modulating devices. , and not necessarily as a tuned L/C circuit. Maybe a power factor phase shift ? In my experience, varying the height of chamber walls affects the proportions of the harmonic spectrum , with shallow chambers favoring higher harmonics over fundamentals. Length did not affect this noticeably. ‘even .032 inches in height difference is very noticeable in tone difference. -
Bellows pressure and musical pitch
Dana Johnson replied to ttonon's topic in Instrument Construction & Repair
Lukasz, especially for lower reeds (B3 and lower) and especially if the press and draw reeds are close in pitch, ( and or have a harmonic component near the paired reed ) I often experience an odd coupling where the flap valve adjacent to the active reed slightly opens and closes causing a burr adding to the reed pitch. This also happens at low to medium pressure when the valve is cupped ( touching at tip but not in center ) even for high reeds, where it opens and closes with the pressure variation, making the burr related in frequency to the active reed. I can usually solve the low reed condition by using a valve that is thicker but not stiffer so it has a lower ability to vibrate at the activating pitch. The noise isn’t valve noise, but rather how the driving pressure on the active reed is caused to vary by the slight bypass of the vibrating valve. I don’t know if this will help your particular case. Dana -
Bellows pressure and musical pitch
Dana Johnson replied to ttonon's topic in Instrument Construction & Repair
I have similar experience to Lukasz, though the longest reed I make is G2. I have also found reeds around C6 and above can actually go sharp at the higher practical pressures. Here, I haven’t seen more than +5 cents. Lower notes are more affected, and quite audibly so, enough to be made part of technique. Here, I do find that press works too like draw, but you have to mean it. When tuning, I find it important to keep pressure constant since it easily affects reeds in the 3-5 cent range at normal playing pressure The big thing Lukasz mentions is the effect of chamber length as its proportion to reed length varies at different pitches, and the pad hole size in conjunction. On a C/G Anglo, I use 4 different hole sizes. ( 5 on a G/D ) because not only can a too small pad hole flatten the note, but it also causes a tone change where higher harmonics are reduced. Wheatstone Linotas I’ve seen have relatively small pad holes and the tone change from exertion while playing is something I’ve heard Noel Hill use for effect. there seems to be a best size for different pitches, though it probably interacts with chamber length, so may not be transferable from one chamber layout to a different one. I originally used one size for everything, but found by progressively reducing the diameter, I reached a point where smaller would actually make the note sound clearer, but still be large enough to prevent the tone change at high pressures. I used that break point to size all the holes. The Wheatstone Duet I used to own had equivalent pad hole scaling (and chamber length scaling ). I do not understand how chambers and tone holes work, but a low reed un an undersized chamber may not operate at all. My tuning block has a series of separate chambers sized for pitch ranges. I switch chambers when a reed starts to be balky or not speak well at a particular chamber. The effect of the chambers / pad holes is large, and trying to tune a reed in an environment where it is clearly getting damped compared to a reed that goes well with the chamber can easily mean 10 cents off what it should be. I use little rubber sheets to cover the tuning ports not in use, and can have a balky reed sound good again by partially opening an unused port. Since I tune at a constant pressure, I am guessing that opening the free port, changes something in the acoustics. The chambers all share a common plenum and all have the larger pad holes emptying into it. one thing I wonder about is the way air moves into or out of pad holes. Air going into a hole looks like water going down a large drain, coming in from the sides as much as above, while air leaving a hole is more jet like. the proximity of the pad to the hole may cause different effects on the press vs the draw because of the relative obstruction of airflow. one last thing, poorly centered reeds are much more vulnerable to flattening audibly as pressure rises, as is a weak (thin ) reed for the given pitch. Sorry not to have a lot of hard data, but given how interactive things seem, it would be easy to misattribute any particular effect. You are going to have to build your own setup where you have more control than I do, where I try to find what gets the results I want without trying to figure out why. Best Wishes, ‘Dana -
After tuning 6000 reeds, I am inclined to agree with Alex, with the exception being that the flattening on raising or sharpening on reducing the set depends a lot on the length of the reed, with longer reeds being less affected than small reeds. I re set a G6 reed on a friends concertina that was set ( probably at the factory ) so high it took a ton of pressure to sound at all. When set to the proper height where it responded quite well, it was 20 cents sharper and needed to be retuned. In most cases for reeds that are responsive, I generally don’t see more than a couple cents variation. I always check the set before any tuning and often find that returning a reed to its proper height is often all that is needed. Given the number of things that can affect pitch, the reed isn’t always the culprit.
-
High humidity causes less problem than low, but your description is a common one. The reed pans can absorb a few grams of moisture, which will change the interaction with the reeds in a noticeable way. The valves also take up moisture and can lift slightly as the lower layer of the leather expands more than the upper. This can lower response as the valves take longer to close. Nothing to worry about, Dessicants get used up quite quickly and need to be restored by heating in an oven, though most packs I’ve seen aren’t packed to be reused. Unless your case is airtight, the “partial pressure of gasses” will always seek to equalize the humidity between the case and free air. Dehumidifiers are more constant, but use a lot of electricity and still need to be in a closed room. The good thing is that wood loses moisture at a much higher rate than it takes it up. Days vs hours. So it does little damage. The best thing to do is play the thing, which can free up sluggish bits and help them find a stable position. Dana
-
Hi David, It has been a really long time since I had that duet, but it’s low note was the same as the low note on the 67 button McCann. The right side went down to C4 originally but because of the music I wanted to play, I added notes town to G3. That made for a very full reed pan. Even in that large format, I couldn’t have added extra notes unless they were inboard. The lever arrangement was difficult enough with all those notes. It used all long scale reeds, so going short on the lower notes would help with the relative volume. If you will remember it was originally the same model as that Wheatstone McCann that that fellow with the operatic baritone voice who played McCann at the early NESI years had. His name escapes me. That thing could roar!. (And so could he) For other makers, that Duet had tilted reed pans so the highest notes had shallower chambers and the lowest were deeper. Both sides were like this, but on a more limited range would be less necessary. It did mean that you had less flexibility with reed placement when thinking about lever patterns, but it was important.
-
I don’t know if you would consider it a deal breaker, but below G3 reeds get bigger fast. Not only that but the chambers need to increase in length over and above what the reed frame would need in order to respond well. For low reeds this means chambers that take up a lot of space. Weight will be more the result of the larger overall size instrument needed to accommodate the larger reed/chamber space on both ends, rather than the weight of the bigger reeds. 30 years ago I converted a Wheatstone 67 button McCann into a 63 button Hayden. The right side was similar to yours except for having a C6 and D6 on the top row, but the left only went down to C2. This was a large instrument, something around 9 inches across the flats, and believe me, there was no extra room. It didn’t include your F#2 or G#2 on the left hand lowest row. The other issue is volume balance. On extended range instruments, the lower notes are much louder than the higher ones which is ok for melody where you can vary your playing pressure to suit the note, but playing left and right together can be a problem since one bellows pressure applies to all the reeds being played. Wheatstone tried with only small success to quiet the left hand by having a much smaller fretwork on the end with the pads being covered by solid surface of the end plate. Lastly and least important, on equal tempered instruments the only difference between D# and Eb is what you choose to label them. Sharps and flats are musical conventions telling you where a note is relative to the home key. The distinction does matter in other temperaments where the “ideal” ratios to the home note are the goal. One of the beauties of the Hayden is the ability to maintain fingering between any key which is asking for equal temperament unless you want to restrict yourself to only a few keys. Dana
-
Especially if you want to play the genres you mention, having more key flexibility is a must. 30 buttons are fully chromatic for most of their range, but getting fluent in a number of keys will require diligent practice. However, if you organize your practice around that goal, it will become much more natural as you get to associate certain pitches with their buttons ‘ direction. One good exercise is to play something in your normal key, then one whole note up on through some sequential keys. You can do half steps too. Remember, you still have to place the music in the instrument’s range. That means if you find a tune goes too high, play it an octave lower etc. likewise if it goes below the chromatic range, you may need to try it an octave higher. A lot of tunes are in the keys they are commonly played in because they were composed on instruments of a specific limited range. Remember, you will have a number of buttons that play the same note, sometimes in different directions. Try using alternates to find the best to use for each key. Lastly, learn some pieces that are a challenge and need the chromatic scale. I like JS Bach partitas for solo violin since the range is about right for a C/G 30 button. You might need to transpose the music to fit the notes you have available. Even if you don’t master them, they will improve your ability to find notes when you need them. Oh yes, even if you read music Jams/sessions are aural things. You need to be able to hear a note and then play it. Whatever you do, make it fun! Dana