

JohnSmith
-
Posts
11 -
Joined
-
Last visited
Everything posted by JohnSmith
-
Building English Bellows.
JohnSmith replied to JohnSmith's topic in Instrument Construction & Repair
Matt, I just measured the jig, and the dimensions of the parallel sides of the hexagons is 100mm. In the end I chose the easy route. I took my old bellows off and, at full extension, carefully measured the internal dimension. I then completely ignored that value, built them slightly undersized, and packed them out with a layer or two of cardboard on each face. I pulled the old bellows over the jig a few times to confirm it was right size. Once I was happy with the fit I wrapped a few layers of cling wrap around it so that any glue seep wouldn't stick my bellows to the form. Including the card that I added, the dimensions are closer to 103mm. After having used the jig, I realise that that dimension is important but far less critical than I first imagined. It could fit within a range of dimensions but the in order for the gussets to be stable (i.e. not push in and out as you change bellows direction) they can't be too large. Nor can they be too small as then the bellows won't fully extend making them inefficient. There is a reason that most concertinas are of similar dimensions and that the bellows for larger and smaller tinas are likely scaled. -
Building English Bellows.
JohnSmith replied to JohnSmith's topic in Instrument Construction & Repair
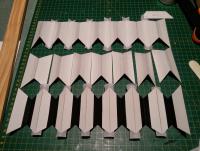
I got a little side tracked today, but managed to get the cards cut and glued into each of the six sets. I'm pleased with how everything is going. It's very time consuming but methodical which suits me fine. The cards have so little friction when I push and pull them. them. Maybe I've gone too light on the construction. Eh I'll know in a few years. Hopefully I will get the jig made tomorrow. I fear I may be stuck then for a little while until my new skivers are finished. I'm not sure yet whether to make the gussets Tedrow style (a long strip with a full edge skive on both sides then cut to gusset lengths) or the diamond-ish shape that I've seen in a few places. Once I get the skivers and have a bit of practice, I might be able to make a better decision. Here're a few more pics Lenghts of cards cut to size. After completing this step I realised I had made extra stock to allow for a few dodgy cards. However I ended up making enough stock to create two sets. Aren't I smart. Side sets in varying levels of completion.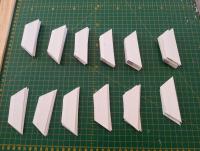
-
Building English Bellows.
JohnSmith replied to JohnSmith's topic in Instrument Construction & Repair
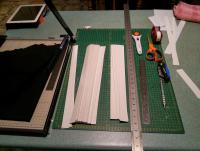
Well I'm two days in and have learnt plenty of lessons. I've cut about twice as many cards as I needed. I think I should measure three times not twice. I did lots of experimenting in order to determine my final materials and the method I was going to use for construction. The card I used wasn't available in a large enough size so I have to opt for a middle ground between the Tedrow method (cards cut long and glued into a concertina'ed board) and a single card construction. I was going to use PVA, but it tended to cause the cards to expand and then tear under tension. The hobby glue works very well. I ended up using 100% cotton Voile for the fabric hinges. It was very thin and glued well. Tomorrow's jobs will be cutting the cards and gluing them into 6 "side sets". Then building the jig to do all the final gluing etc. Plenty of cards and supplies. End of day two.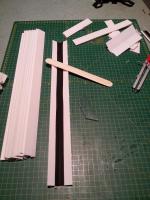
-
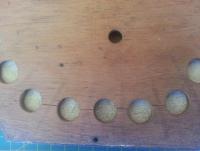
I have these exact two problems on my Wheatstone. I am doing a complete overhaul of the internal parts so my solutions might be a little different given that I will have the pads and buttons out. For the pad board cracks. I can't remember where I read it (probably Dave's book) but the solution was to first put a strip of tape across one side of the pad board. Then line each of the concerned air ways with tape/plastic/baking paper or anything that isn't likely to stick to the glue too easily. Then simply fill the cracked space with superglue. It's thin and will thus pour in easily. After completion simply remove the tape and carefully clean up any excess that has fouled the airway or pad board surfaces. For larger cracks the suggestion was to cut the cracks larger and glue in new timber. I won't be going this route. My board is pictured below. As for the verdigris. the Lachenal crowd have it easy here I'm told with the removable lever arms. Dremel make small felt polishing bits. This with a little polishing compound should bring most of the muck off. I will be doing plenty of testing first before I attack my instrument of course. The pivot has me worried a little. I might simply use the more pointed tip version to carefully do it and then floss the pivot joint with some cotton or fishing braid. I'm not quite sure how yet but I will be covering the action board somehow and using a small vacuum cleaner (or my extractor) to try to keep the area as clean as possible. As I said, I'm doing a full rebuild so I will brush everything out and clean it all before I put new pads in. 0000 steel wool would also do the job but be a little messy.
-
Building English Bellows.
JohnSmith replied to JohnSmith's topic in Instrument Construction & Repair
Hi All, Thanks for everyone's continued input. It really is appreciated. Well I think I am nearly ready to begin building. I have most of the materials and the time to get it done. Here are my final thoughts before I dive in. I'm going to go the route of Tedrow. There seems to be much less finnicky work and room for error. By this I mean starting with long lengths of card rather than individual cards. I think I will go with a 30mm depth for the cards. I will build the internal wooden jig once I know the size of the internal "plane". I could calculate this mathematically but measuring it seems easier and more accurate. I purchased three thicknesses of card (0.87mm, 0.96mm, 1.335mm (black)). I think I will use the 0.87mm as the 0.96mm seems to be a laminate and the black card is too thick. the 0.87mm's surface is glossy but I will hit it with a little sandpaper where the glue will be. It took a lot of research to find what I could have easily measured, but for the sake of anyone else reading this Australia uses the GSM (grams/m2) to measure the weight (and thus ~thickness) of paper/card stock. The first two cards are 600gsm and the thickest card is 1000gsm. I got 2 skins of chrome tanned kangaroo gloving leather from Packer that are ~0.38mm and ~0.48mm. I will use the thicker leather. It is relatively stretchy which will make it difficult to skive no doubt. My local sharpener is currently making me two skiving blades with opposite orientations which should allow me to get a consistent edge skive. I've been practising my skiving on a piece of plate glass and after a few hrs of practice, make far less mistakes. I ended up simply buying some white cotton at Spotlight to use for hinging. It is thin and cheap. They did have cotton hemming tape that looked very thin. However, it was more expensive than the other. For the fabric to card bonds I will use Helmar's Premium Craft Glue. It is acid free, and, by the smell of it, acetone based meaning quick drying. I don't see why I can't use this for leather to card bonds as well. I have plenty of PVA around though if anyone can see an issue with this. I will use hide glue for the cloth end run the same as Bob uses. I like the idea of having this extra reinforcing layer under the leather end runs. Thanks again everyone for the help. I'll keep you posted on the progress. -
Building English Bellows.
JohnSmith replied to JohnSmith's topic in Instrument Construction & Repair
I was going to go to my local framer's store to see if he had any linen hinging tape before I go to Spotlight. If they don't have anything in that thickness range I will simply find linen or calico to use (I have plenty of fabric in the sewing cupboard). I do some of my own sewing. A lot of my hiking kit (tarps, bivys, packs, sleeping bags et al.) as well as my caving and canyoning gear (harnesses, etriers, packs) were made by me. (I have a lot of very thin and strong nylon ripstop, spinnaker, and cuben fibre fabric around, but I don't think it is suitable.) I assume the bias cut is just to stop fraying. I was thinking that I could rebate the leather into the card. I wouldn't have to skive it, and it would appear flush with the surface of the card. I understand that it's mostly hidden. Maybe gluing the leather before the underside valley hinge would create the ~1mm gap. Ease and consistency was my goal, that's why I was thinking of making a jig. However, I completely understand that it is something that I should spend time getting better at. Terry That is interesting. That seems like so little pressure. Good to know the suck test will suffice. I assume you have done the pressure testing for the pads on your flutes? I have been going to the National for a long time so It is likely that I have come across you there. Geoff Thanks for the words of encouragement. I understand exactly what you mean about the man hours that go into instrument building. I've found myself many times staring at the wall for hours thinking of how I will make the jig to make the jig to accurately do some simple task. I wish I were paid for all the jigs I've made. Henrik Nej, jag kan inte tala Svenska. However, I have watched an embarrassing amount of Scandinavian TV. Languages are one of the things that I really love. Whilst I have to read the subtitles, I actively listen to the dialogue and constantly pause to translate things. It doesn't take long before some basic phrases get stuck. ( Saga Norén, Länskrim, Malmö ) -
Building English Bellows.
JohnSmith replied to JohnSmith's topic in Instrument Construction & Repair
Such great help from from everyone. I'm finally settling on my ideas and have begun ordering the relevant pieces I can't source here. Terry, I'll give the old "suck test" a go first, and thank you very much for the offer. (On a side note, I think I've seen/ met you before. Do you attend the National?) Henrik Tusen tack för informationen. Det är mycket bra. The dimensions are especially helpful. I have seen the jig for building it on and came up with a similar design that is easier to build. I will try to be helpful and make a photo series of me building the bellows including jigs etc.. So here is where I'm at currently Cards 2ply Alpharag (0 out of 4 framers I contacted were able to give me a thickness for this. However their product manual states 0.75mm. Maybe a little thick but with the end thinning it may work. That works out to be 0.3mm extra per fold). 1ply was 0.35mm which seemed a little too thin. Cotton Tape Sourced from my local haberdashery store Leather I have contacted Packer and will purchase a hide of 0.5-0.6mm K100 gloving leather for the top and end runs, and gussets. Also a hide of 0.35-0.4mm gloving leather for the valley hinges. This is perhaps a little thicker than the others out there but I may rebate the bottom of the cards too to glue this in. Glues Acid free bookbinders glue for the internal linen-card bonds and hide glue for the external linen-card. Hide glue for all leather-leather and leather-card. I will of course test before I move onto the job as I've only used hide glue with timber. Not sure about the end runs onto the frame. I am concerned about how the next person gets them off. My gut tells me hide glue, as it would be easy to sand off the wood but not so easy to remove the end runs. The next dilemma is how to consistently skive feather edges. I'm not buying a Scharffix 2000 no matter how impressed I am with its design. I have a few ideas for an edge skiving jig. My Dremel with a sanding bit has worked with 1.0mm kangaroo on small jobs, but I'd like a more elegant solution that uses a blade. My local sharpener has given me off cuts of planer blades to make various knives and tools from in the past so I might go see them. -
Building English Bellows.
JohnSmith replied to JohnSmith's topic in Instrument Construction & Repair
Now where's the fun in that? The likelihood is that it will cost me more than that price to make my own. The journey is the point. To wax philosophical here I'm reminded of a quote "Man is never so authentically himself as when he is at play." -Johann Schiller. I understand your sentiment though. I get it all the time. I've spent most of my life learning new skills because it brings me joy. I'm an educator and nothing excites me as much as learning something new. Anyway why would I want to learn German or Greek or translate Cuniform Tablets when I can pay someone else to do it for me (or Google Translate for that matter)? (This is meant as a playful riposte, please take it as such) However, you do raise a valid point. My work will not match the quality of the Wheatstone builders of that era. If they turn out okay and serve me well, I'll be happy. Maybe they won't be the same set on there in another 100 years, but given that as far as I can tell bellows are a consumable part (albeit a long term rather than short term), and a new set will only cost me $300AU, I'm not too concerned. Perhaps we are motivated by different principles when it comes to restoration. Primum non nocere; a new set of bellows will not destroy the machine. This particular model is abundant, but if it were a rarity, I would treat it with the due respect. (Edited for grammar) -
Building English Bellows.
JohnSmith replied to JohnSmith's topic in Instrument Construction & Repair
It's more for the adventure I suppose. I will do my best to preserve the current bellows when they come off. I like to keep all the stock parts when I repair things. I also wanted an extra fold. as for the old bellows they would need serious work. All top and end runs replaces, a good many gussets. They are stiff and noisy. It seems like more fun to make a new set. Given that I am also doing the gaskets it makes sense to take the end runs off too. Thanks for weighing in Terry. I'm don't think my bellows will be up to Grand Master Tedrow's quality on a first attempt, but I will certainly give the test a go (The current bellows fail in around 3 seconds). The link did not appear. Your linen/glue thinking is reasonable. You can sand the cards, getting them consistent is the trick, some sort of jig helps. Only the top needs thinning. I don't do it myself. Sorry about the link. It should be http://www.artscene.com.au/shopping/boards/matboards/alphamat-alpharag I will contact this mob tomorrow and find a rough thickness for the 2ply. I assume by thinning just the top you mean a kind of ~3/8" rebate that the fabric and then leather will bind to. Thus making the thickness of the mountain leather fold slightly thinner. How much material are we talking here? If the board is 0.7mm, is half the thickness going to leave enough card behind? (I'm thinking of a jig using a sanding bit on a Dremel or maybe even doing it on my router table as I would usually do a rebate.) I assumed the direction of stretch would be aligned radially around the top runs? It seems logical, as if it were linear to the direction that the bellows are moving eventually they would lengthen and create a less stable joint? Correct me if I'm wrong. Lamb skiver it shall be. I contacted Packer today and they suggested gloving leather would be my best bet. http://www.packerleather.com/sports-glove-leather.html this page shows the products with a range of thicknesses. It seems I won't have to do any splitting if I can get it in the right size. So what thickness would be most appropriate? Should the gussets be different to the runs? I see Concertina Spares uses 0.2mm for the end runs. Should I split down to this thickness for the tops as well as the ends? -
Building English Bellows.
JohnSmith replied to JohnSmith's topic in Instrument Construction & Repair
Thanks for the welcome Ken. I'd like to help out when I can, but I'm only just starting in the concertina world and have more questions than answers. Chris thanks for your detailed reply. I am based on the Mid North Coast in the Manning Valley. I agree with this. Function over form is more important to me in this case. This is my first bellows build, so I'm not expecting them to be perfect. I'd like them to work though, so I'll probably pay more attention to air tightness than the quality of the edge skiving and hidden glue joints. As I said, I will eventually be playing fast tunes with a bit of oomph so keeping them a little thicker may be useful. The link I included in my post goes to a supplier of Alpharag in Sydney. They have 2ply for, what seems to me, a reasonable cost. I assume I thin the edges of the board in the same method that I edge skive leather? In terms of fabric I'm thinking that buying very fine linen and using a bookbinding glue/ hide glue might be cheaper than the gummed linen tape. I have bought leather from a number of places in Australia, but I think Packers is the only place that has chrome tanned kangaroo (veg is just too stiff). They have lots of thicknesses and finishes to choose from. There is a craft variety that is about 0.65mm (still needs to be split), but perhaps one with a waterproof finish might be useful? As for the valley leather. Bob uses sheep skiver which I can get through Tandy leather Australia, but would the the kangaroo used for the rest of the job suffice? I think I'll stick with the 25-30mm figure. It seems to be a good compromise. Thanks again -
I'm just starting an overhaul on a 1913-14 metal end Wheatstone English (#26159). As part of the job I'd like to build a new set of 6 fold bellows to replace the 5 fold set. I have pored over the site (and the net) for a few weeks and have learned as much as I can so that I can ask informed questions about building ENGLISH bellows. Firstly I should mention what music I intend to use it for as that surely has a bearing on the requirements. I will mostly be playing solo, accompanying traditional folk songs. However, I will also be playing ITM *shock, horror*, and Scandi tunes (and maybe someday a little Bach). I'm buying all of the consumables through Concertina Spares, and, whilst I know Mark sells all the necessary materials, I'd really love to source and purchase the materials myself locally and do a complete build. So, down to some questions. As I understand it, the difference between Anglo and English bellows is the thickness of the folds. This is presumably due to using thinner card and perhaps thinner top run leather. The difference in thickness is really to make the bellows respond quicker and last longer with the frequent bellows reversals required on an Anglo. After reading plenty, I have decided to use cotton ragboard, but I can't find anywhere that mentions a thickness for bellows card for English concertinas. I have seen 4ply (~1/16" or 1.5mm) as being the thickness for Anglos. Am I to assume that 2ply (~1/32" or 0.75mm) is the correct weight to use? I will likely use this supplier. I have very little idea on what leather thicknesses to use. Being in Australia it is relatively easy to get my hands on kangaroo leather, which like goat and dog, is a good air tight leather. I'm trying to get my hands on some chrome tanned kangaroo which should be a lot softer than the veg tanned kangaroo I have used in the past. I will build a home splitter to thin down the leather but to what size? Bob's photo thesis references 0.025" (0.635mm) but this is for an Anglo. What would be the appropriate thickness for the top runs, end runs, and gussets for an English? Let's move forward to glues. I have built instruments and projects before using hide glue and am happy to use it throughout this job where applicable. I assume all leather- leather, leather- wood, leather-card bonds will be fine using hide glue. Bob also uses gummed linen tape (which have found here) for the inside. I assume tape was used here to give structure whilst building and offer strength and support for a frequently exercised joint. It doesn't need to be air tight as it is internal and the outside is covered with leather. Is there anything wrong here? How about depth. Currently the 5 fold bellows have 1" folds (measured from outside with the bellows in situ). Should I stick with 1" or maybe increase the depth. I do like the idea of having lots of breath in the instrument but not if it compromises stability. As for papers. I really like Wim Wakker's gold stars on black paper. Is it okay to use on a chrome plated instrument? That ought to be enough to get me in trouble for now. JohnSmith I know I shouldn't just barge in here on my first post and expect others to help. I hope that any answers I receive help others who have the same questions.


