

shipcmo
-
Posts
128 -
Joined
-
Last visited
Everything posted by shipcmo
-
I'll post an article I wrote awhile back. I think that the old, older the better, Bastaris deserve recognition. Common Repairs The 30 button Bastari/Stagis will eventually have a problem with the rubber bushings, or sleeves, holding the buttons to the pad levers. The rubber will eventually get hard and the pad lever will wear a groove in the rubber where it bears on the lever. Thus the buttons will cock in their movement and tend to stick in their holes of the endplate. The first thing to do is to use model airplane fuel tubing rather than surgical tubing for the replacement. I use Aerotrend “Blue Line” silicone (www.aerotrend.com). I have experimented with two sizes of tubing; 3/32” ID (part # 1003,)and 1/8” ID (part # 1005). The 3/32 has an OD of 7/32”, while the 1/8 ID’s is ¼”. Either size will work, but I have found that the smaller seems to be best. There are some places where there can be a clearance problem with adjacent levers, so the smaller OD has an advantage. In order to get the best performance from the buttons one must understand the mechanics of the action. When pressing the button it should travel perpendicular to the end plate. However the valve lever moves in an arc, so the attachment of the button to the pad lever must act not only as a hinge, but the attachment to the button shaft must have some flexibility to move slightly along the axis of the lever as well. Otherwise the button would also move in an arc and bind in the endplate. With this in mind the length of the sleeve should be just long enough to hold the button on the lever. Too long a length will hold the button too tightly to the lever and not allow any motion along the lever. It should not be enough to let the button slide on the lever, but shift a little using the flexibility of the tubing. Again, too long a length will compress the tubing limiting that flexibility. While replacing the sleeves, it may be noticed that some of the lever arms have been bent sideways as a result of the cocking of the buttons. Also, the arms themselves may wobble due to the U bracket holding the axle being too wide. A good quality pair of needlenosed pliers will be necessary to effect the adjustments. The potential dismantler must use a proper fitting screwdriver. The preferred type is what is called “hollow ground”. A standard flat screwdriver has tapered sides, and often the end is often not absolutely flat and square either, even when new. The optimum way to make one is with a grinding wheel, hence the name hollow ground. However one can make one with a fine toothed file. The trick is to draw the end of the screwdriver along and over the file (which should be securely mounted in a vise) rather than moving the file against the screwdriver. I also found that if I clamped the shaft of the screwdriver in visegrip pliers and moved the screwdriver against the file by means of the visegrips hanging below and against the file I was able to get the best results. Further, I hardened the tips, since nothing is more damaging to a slotted screw head than a screwdriver with a soft tip. There are commercial chemicals for hardening, but heating the tip cherry red and dousing in oil is adequate. Bellows leaks are generally not that big an issue. By using liquid electrical tape (page 566, West Marine catalog), repairs can be readily effected, with a light coating on the inside of the bellows. If there is a large crack or tear, the trick is to lightly saturate a piece of handkerchief cloth with the liquid tape, then apply to the inside, after taping a piece of food plastic wrap to the outside in order to keep the goo on the outside. A simple jig is in order to keep the bellows extended during this operation. (see attached) Another source of leaks is the gasket material around the bellows end where is fits to the reed and action frame. A recommended replacement for the common “string”, is self-adhesive, closed cell vinyl foam weatherstrip, 1/8” (T) x ¼” (W), available from your local hardware store. Cleaning the reeds is best done with a strip paper drawn between the reed and the plate.
-
Appropriate Concertina For 1st Time Player
shipcmo replied to AnnW's topic in General Concertina Discussion
Hi, I'm sure you will garner a lot of advice. The particular 30b on eBay @ $100 sounds like it might be "unreal". If you will give the eBay number, I'm sure someone will take a look and make a comment. Cheers, Geo -
I wrote this a while back, but it is valid for the 20b mofels. The 30 button Bastari/Stagis will eventually have a problem with the rubber bushings, or sleeves, holding the buttons to the pad levers. The rubber will eventually get hard and the pad lever will wear a groove in the rubber where it bears on the lever. Thus the buttons will cock in their movement and tend to stick in their holes of the endplate. The first thing to do is to use model airplane fuel tubing rather than surgical tubing for the replacement. I use Aerotrend “Blue Line” silicone (www.aerotrend.com). I have experimented with two sizes of tubing; 3/32” ID (part # 1003,)and 1/8” ID (part # 1005). The 3/32 has an OD of 7/32”, while the 1/8 ID’s is ¼”. Either size will work, but I have found that the smaller seems to be best. There are some places where there can be a clearance problem with adjacent levers, so the smaller OD has an advantage. In order to get the best performance from the buttons one must understand the mechanics of the action. When pressing the button it should travel perpendicular to the end plate. However the valve lever moves in an arc, so the attachment of the button to the pad lever must act not only as a hinge, but the attachment to the button shaft must have some flexibility to move slightly along the axis of the lever as well. Otherwise the button would also move in an arc and bind in the endplate. With this in mind the length of the sleeve should be just long enough to hold the button on the lever. Too long a length will hold the button too tightly to the lever and not allow any motion along the lever. It should not be enough to let the button slide on the lever, but shift a little using the flexibility of the tubing. Again, too long a length will compress the tubing limiting that flexibility. While replacing the sleeves, it may be noticed that some of the lever arms have been bent sideways as a result of the cocking of the buttons. Also, the arms themselves may wobble due to the U bracket holding the axle being too wide. A good quality pair of needlenosed pliers will be necessary to effect the adjustments. Welcome & Good Luck with the repairs. Cheers, Geo
-
Jim, The pale blue sleeves indicate that the original rubber tubing has been replaced by model aircraft engine fuel tubing. Sometime back there was a Bastari on eBay that had that done to it. Was yours that one? It looked like an OK job to me, but I could not be sure from the pictures. Anyhow, they should last for some time. I will look for the tubing source & part no. Cheers, Geo
-
First off, what is the condition of the rubber sleeves holding the buttons to the arms? Generally in the older instruments this needs replacing. However, I quote from C&S Vol. 2, No. 1. "There is an additional problem that will cause tipping and sticking buttons on the G row of the 30/36 button Anglos. Because the valve arms on this row are so short, the button attachment point is very close to the tip of the valve spring. There are two problems that can occur due to this. One, if the end of the spring that is bent in a hook shape around the valve arm is not lying close to the arm, the rubber sleeve of an adjacent button will snag on it. The hook should be U rather than V shaped. (Fig. 4) The spring wire can be bent in closer to the arm by carefully pinching it together with the needle nose pliers. The other problem on the G row, particularly on the buttons in the middle of the row, is that the end of the spring pushes the button away from it, causing the button to tilt. (Fig. 5) In fact, to be correctly positioned, these buttons need to have the rubber sleeve over the end of the spring. This calls for some modification to ensure that once positioned, the button will stay in place. Gently work the putton to the correct position on the arm using the tip of a small screwdriver to push the rubber sleeve over the tip of the spring. Then using some stiff string, put a Clove hitch around the arm, snug against the rubber sleeve (I use heavy waxed sail thread) to hold everything in place. (Fig. 6) Continually check the process of adjusting the buttons by fitting the end plate on the frame. When assembling the end plate and the frame it is helpful to use to nails as pilot studs (on opposite sides of the frame) instead of the wood screws. When everything fits together correctly, and the button is at the right position on the arm, make sure it stays that way by applying a drop of Elmer's Glue All on the string on both sides of the arm." Sorry I don't have scanner yet to be able to include the figures. Cheers, Geo
-
Who Knows Anything About This Maker?
shipcmo replied to briankc's topic in General Concertina Discussion
-
Concertina & Squeezebox Music Project
shipcmo replied to fiddlersgreen's topic in General Concertina Discussion
Well, I suppose I'm the last of the C&S crowd "available". Joel is incommunicado, John seems to be "retired", but I think I can locate him. The copywright issue should be no problem. As far as I know the originals were lost in Joel's fire, so a re-mastering would have to be from available tapes, if ones in good condition can be located. An interesting project. Cheers, Geo -
If You Can Only Afford A Stagi?
shipcmo replied to semaj1950's topic in General Concertina Discussion
WHERE ANGLES FEAR TO TREAD! Here we go: Jim, Since you mention upgrade to a 30b, one assumes you have experience with the excentricities of the instrument. Especially the need for repairs. ( I have not known of a player that at some time or other, didn't have to effect some sort of repair(s), usually during a session.) So, how about a 30b Bastari? They come up from time to time on eBay, from $75 to $150. The most common need for repair are the rubber sleeves holding the buttons on the valve levers. Replacing the rubber with model airplane fuel tubing is cheap & easy. Next, are leaks from the cotton wicking material where the bellows attaches to the ends. Using closed cell foam weatherstripping instead of the wicking is the solution. ( Kudos to Richard Morse for that suggestion) Bellows leaks, usually at the corners, can be repaired using liquid electrician's tape on the inside. Unless the bellows are really "blown out". Valve pads can be replaced if needed. Bob Tedrow will sell you ones that fit, if you don't feel comfortable with making your own. Which is probably not cost effective anyhow. The original handstraps of the Bastaris are miserable, but once again, replacements from one of the dealers or repairers are not that expensive. Tuning: In my experience, the early Bastaris were reasonably in tune, but tuning is a subject of individual taste. I frankly do not recommend one attempt tuning. And I have no idea what tuning by a professional would cost. So there you are! Cheers, Geo -
If Not Names, At Least Locations
shipcmo replied to Daniel Bradbury's topic in Forum Questions, Suggestions, Help
One can even add a comment! -
It is obviously a Bastari. But I have never seen one like it! Not with those "leather" ellows with papers, and the "traditional" handstraps. It has to be one of the first, since I didn't think Bastari started until ca 1960. Cheers, Geo
-
This is item #2563520288 The end plates look like the Bastaris (or W15 student model Stagi) but has 6 fold "leather" bellows whereas the Bastaris & students have 8. Also the buttons appear to be bushed metal ones. Could this be a Tedrow rework? Cheers, Geo

-
Well, you could claim you were a Conneticut Yankee from King Arthur's Court. Cheers, Geo
-
The picture is from a German web site, "Die Konzertina", which shows a new Scholer (note the medallion on the end), and, if my translation is correct, a single reed instrument. Note the Scholer rose motif. Cheers, Geo

-
From what I have seen, the post WWII instruments have almost interchangeable parts and construction techniques; making me think there has been only one maker. The pre WWII instruments have marginally better construction; e.g. using a flat spring on the air valve rather than a bent wire one. But then, I am no expert, just curious.
-
I am curious as to the number of bellows folds on the instruments that have greater than 20 buttons. I have seen from five (5) to thirteen (13!). My Jeffries & Dipper have 7, and my Bastari 8. I believe that I was once told that the 5 fold instruments were "student" ones. Comments? Cheers, Geo
-
The answer is: NO, the "preview post" does not show an "attached" picture. Also, some browsers do not seem to be able to upload the attachment. Cheers, Geo
-
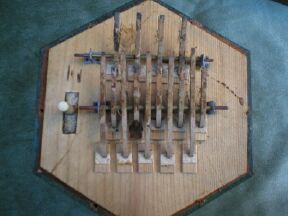
And, an "old" action. Pre WWII.
-
And here is a view of the action

-
Here is a view of the reed plates

-
Does the "Review Post" show the attached picture?
-
Paul, Right on. I was trying to be succinct with the description an had written "sets of reeds", then decided that was not adequately descriptive, but did not get back TUIT. Jim, Thanks for the comment. I don't know that I have ever seen a definitive prose description of German concertinas. If I can figure out how to get them down to acceptable size, I will post pictures of the action & reeds. Cheers, Geo
-
This topic got started, sorta, in the "Concertinas of War". Given that there always seems to be interest in less expensive instruments here on Cnet, and that some of the participants already have a German one; I thought it might be appropriate to have a "complete" discussion. First, with regard to the works: 1. They have wooden actions, with the air valve button affixed directly to the valve flap (usually rectangular). 2. The reeds are generally 5 to a plate. 3. Normally the reeds are brass. 4. The single reed instruments have the reed plates mounted flat on the reed pan, where the double reed ones have the plates on boxes raised above the pan. 5. Most are 20 button. As for the exterior: 1. Generally the button rows are parallel to a side, with "large" diameter buttons. 2. The double reeded have frames in the bellows, usually 2, with 9 folds. However I hve seen a picture of a new Scholer with 1 frame and 8 folds. 3. The corners of the bellows ends and frames have metal "caps". BRAND NAMES & Manufacturers At this point I think there should be made a distinction between "German made", and "German type". As far as I can determine, only Scholer are German made, unless Hohner is now making their own. If I recall correctly, Hohner was once marketing the Bastari, and some of the Hohners I have seen have the Scholer roses motif on the sides of the ends. I can not speak to the Bestler and Laurel, having never had one in hand, but they look suspiciously like the JLDyer Chinese. Curently, there are two "real" German instruments on eBay: 2561398187 & 2561996701 Comments, please. Cheers, Geo
-
Buying First Concertina...help!
shipcmo replied to rookie1337's topic in General Concertina Discussion
The "Maestro" looks suspiciously like one of the JLDyer Chinese ones. Cheers, Geo -
Buying First Concertina...help!
shipcmo replied to rookie1337's topic in General Concertina Discussion
Replacing the rubber sleeves on the Bastari buttons is very easy. I wrote an article about that, but have since suffered a hard disc crash. Ask Ken Coles to either publish it here, or send you a copy. Cheers, Geo -
Buying First Concertina...help!
shipcmo replied to rookie1337's topic in General Concertina Discussion
The "Regoletta" is a Bastari, ca 1980; probably in C/G. Not a bad instrument for a beginner, but the rubber sleeves holding the buttons to the valve levers will have to be replaced. Cheers, Geo